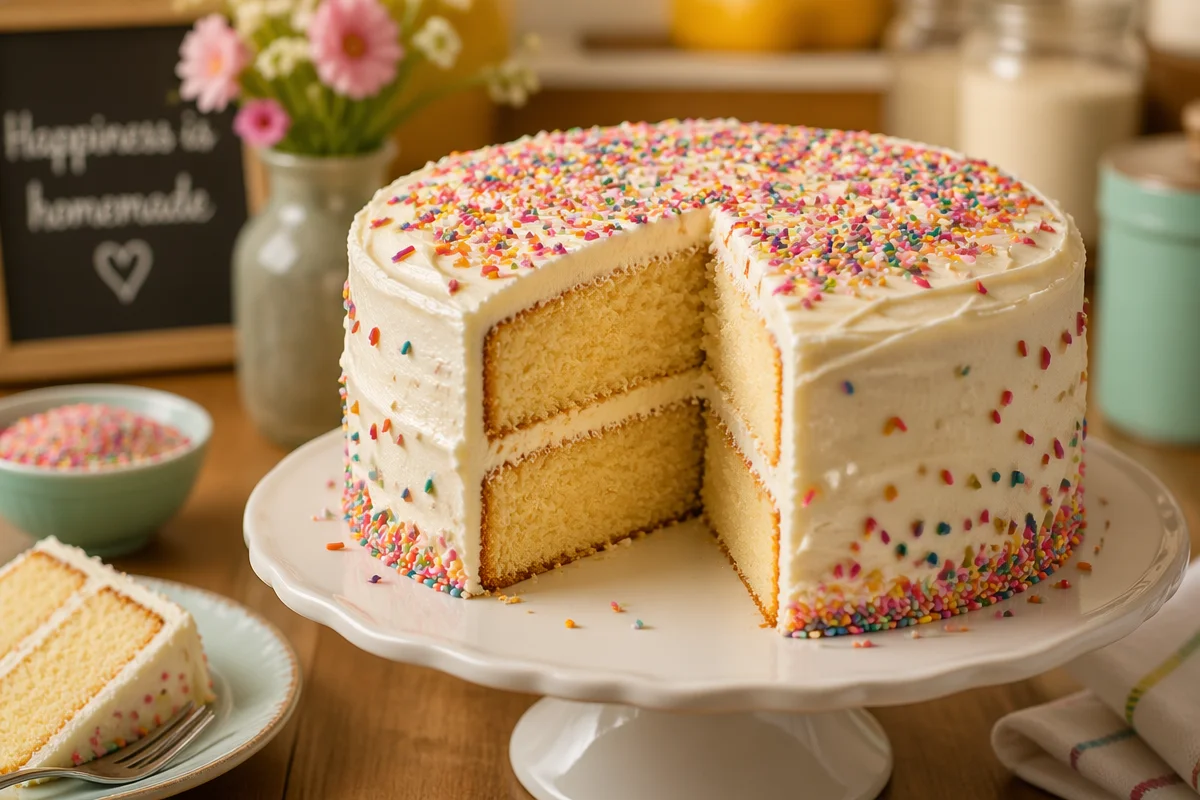
vanilla cake from scratch is one of those things that sounds fancy until you realize it is basically just good ingredients, a bowl, and a little patience. If you have ever baked a cake that came out dry, flat, or weirdly eggy, you are not alone. I used to think vanilla cake was “boring” until I tasted a homemade one that was soft, warm, and actually smelled like vanilla. This is the kind of cake I make when I want something reliable for birthdays, potlucks, or a random Tuesday that needs a win. I am going to walk you through it in five simple steps, like I would if you were standing in my kitchen with a spoon in your hand.
Origins of this vanilla cake
This recipe came from a very normal moment: I needed a cake, I did not want to run to the store, and I definitely did not want to babysit a complicated method. Years ago, I tried a few classic “perfect vanilla cake” recipes, and they were fine, but they felt a little too heavy for the way my family eats dessert. We like a slice that is fluffy, not greasy, and sweet without being loud.
After a lot of small tweaks, I landed on a version that leans into everyday comfort. It has that familiar bakery smell, but it still tastes homemade in the best way. The main thing I learned is that vanilla does not hide mistakes, so the little details matter more than people admit.
Also, this cake is flexible. I have baked it as a layer cake, cupcakes, and even a sheet cake for a last minute party. It is the same cozy vibe every time, and that is why it stuck around in my recipe notebook.
Why this cake is safer than typical cream butter and sugar cakes
Let us talk about why this one feels a bit more forgiving. A lot of traditional cakes start with creaming butter and sugar for several minutes. When it is done right, it is great. When it is not, you can end up with a cake that is dense, dry, or bakes unevenly, and you might not even know what went wrong.
My version still uses butter because flavor matters, but it does not depend on perfect creaming to work. Instead, it relies on a simpler mixing flow and a little extra moisture support, so you get a soft crumb even if you are not using a stand mixer or you are baking while distracted by life.
Here is what makes it feel safer and more reliable at home:
- Less risk of overmixing early, since we are not trying to whip tons of air into butter for ages.
- Moisture insurance from milk and a touch of oil, which helps the cake stay tender even the next day.
- More even baking because the batter is smoother and easier to spread in the pans.
- Friendlier for beginners because you can follow the steps without guessing what “light and fluffy” is supposed to look like.
So yes, it is still cake. It is still a treat. But it is the kind of treat that does not punish you for being human in the kitchen.
Tips for Vanilla Cake success
If I could stand next to you while you bake, these are the quick tips I would blurt out while you preheat the oven. Vanilla cake is simple, but it is also honest. You will taste the vanilla. You will notice if it is dry. So let us stack the odds in your favor.
Little habits that make a big difference
Bring your cold ingredients closer to room temp. I do not mean leaving them out for hours. Even 20 to 30 minutes helps. Cold eggs and cold milk can make the batter look a bit curdled, and that can lead to uneven texture.
Use real vanilla if you can. I am not a snob about it, but a decent vanilla extract makes the whole house smell like a bakery. If you have vanilla bean paste, even better, but not required.
Measure flour the gentle way. Spoon it into the measuring cup and level it off. Scooping straight from the bag packs it down, and too much flour is the fastest road to dry cake.
Stop mixing once the flour disappears. When you keep stirring and stirring, the cake can turn tight and chewy. We want soft and tender.
Do not overbake. This is the big one. Vanilla cake goes from perfect to “why is it so crumbly?” pretty fast. Start checking a few minutes early.
And one more thing that sounds obvious, but I still do it: I read the whole recipe before I start. It saves you from that moment where your batter is ready and you realize the oven is not even on yet.
How to make my best Vanilla Cake
This is the part you came for: the five simple steps. I am going to keep it super practical, like we are doing it together. This vanilla cake from scratch makes two 8 inch layers, or a 9 by 13 sheet cake. You can also turn it into about 24 cupcakes, just shorten the bake time.
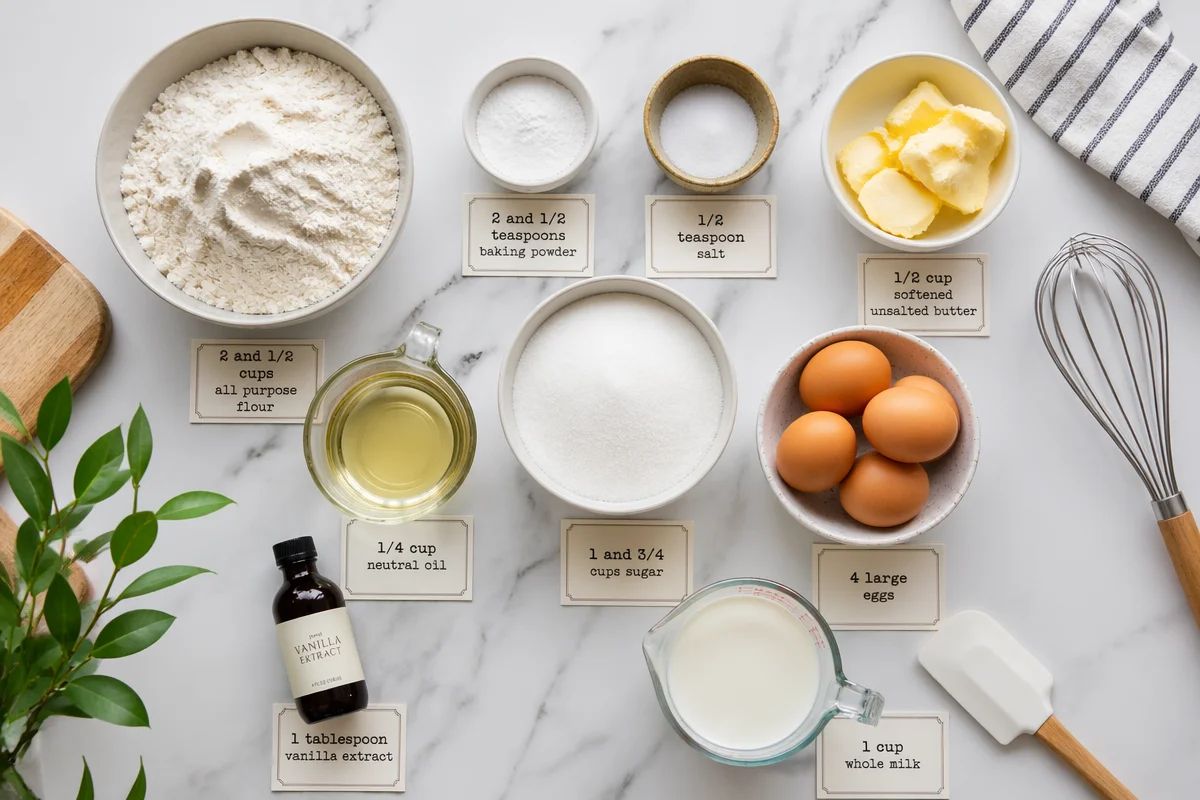
What you will need
- 2 and 1/2 cups all purpose flour
- 2 and 1/2 teaspoons baking powder
- 1/2 teaspoon salt
- 1/2 cup unsalted butter, softened
- 1/4 cup neutral oil (like canola or vegetable)
- 1 and 3/4 cups sugar
- 4 large eggs
- 1 tablespoon vanilla extract
- 1 cup milk (whole milk is best, but 2 percent works)
Quick note on pans: Grease your pans, line the bottoms with parchment if you have it, then lightly flour the sides. It makes your life easier later.
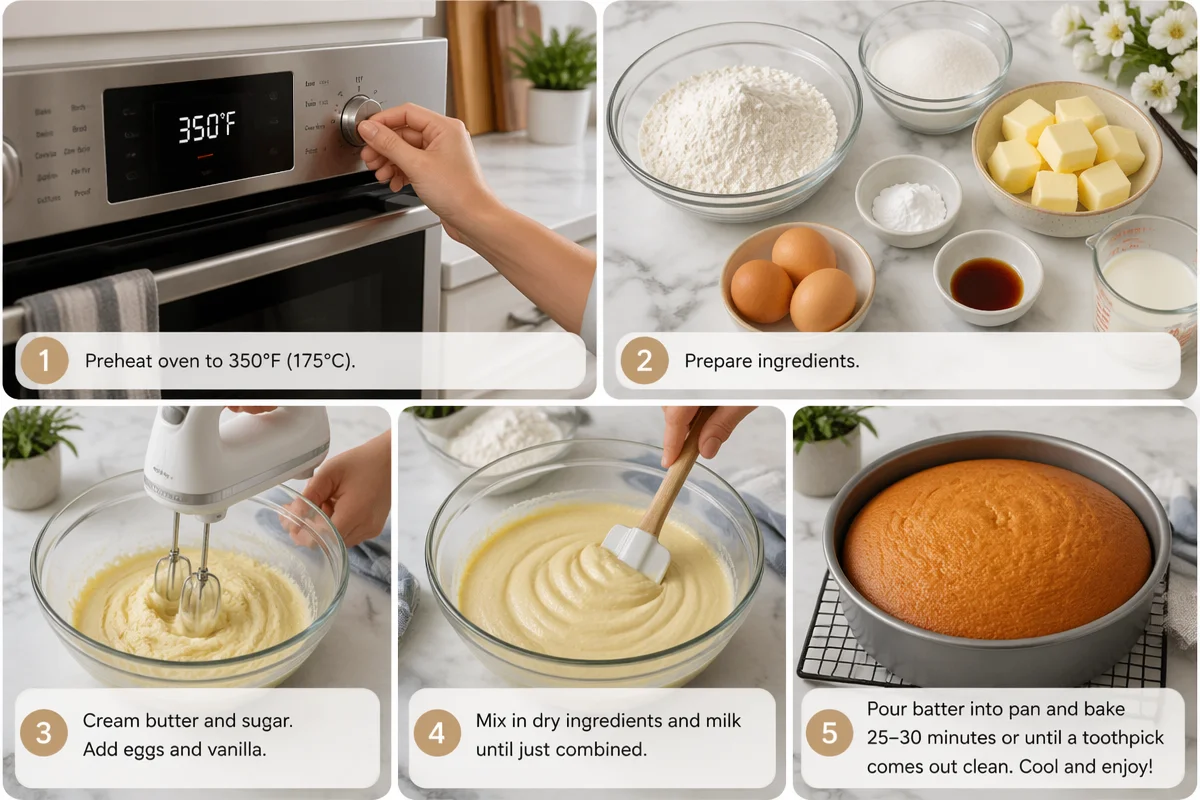
Step 1: Get the oven and pans ready
Heat your oven to 350 F. Prepare your pans while it warms up. This matters because baking powder starts working as soon as it gets wet, so you want the oven ready when the batter is.
Step 2: Mix the dry ingredients
In a medium bowl, whisk the flour, baking powder, and salt. I like whisking because it spreads everything evenly without extra tools. Set it aside.
Step 3: Build the base flavor
In a large bowl, beat the butter, oil, and sugar together until it looks lighter and a bit creamy. This does not need to be a 10 minute marathon. Add the eggs one at a time, mixing after each. Stir in the vanilla extract. At this point, the batter should smell amazing, like sweet vanilla and butter.
Step 4: Combine without overdoing it
Add the dry ingredients in three parts, alternating with the milk. So it goes like this: dry, milk, dry, milk, dry. Mix gently between additions. Once you do not see streaks of flour, stop. The batter will be smooth and a little thick, but still easy to pour.
Step 5: Bake, cool, and frost
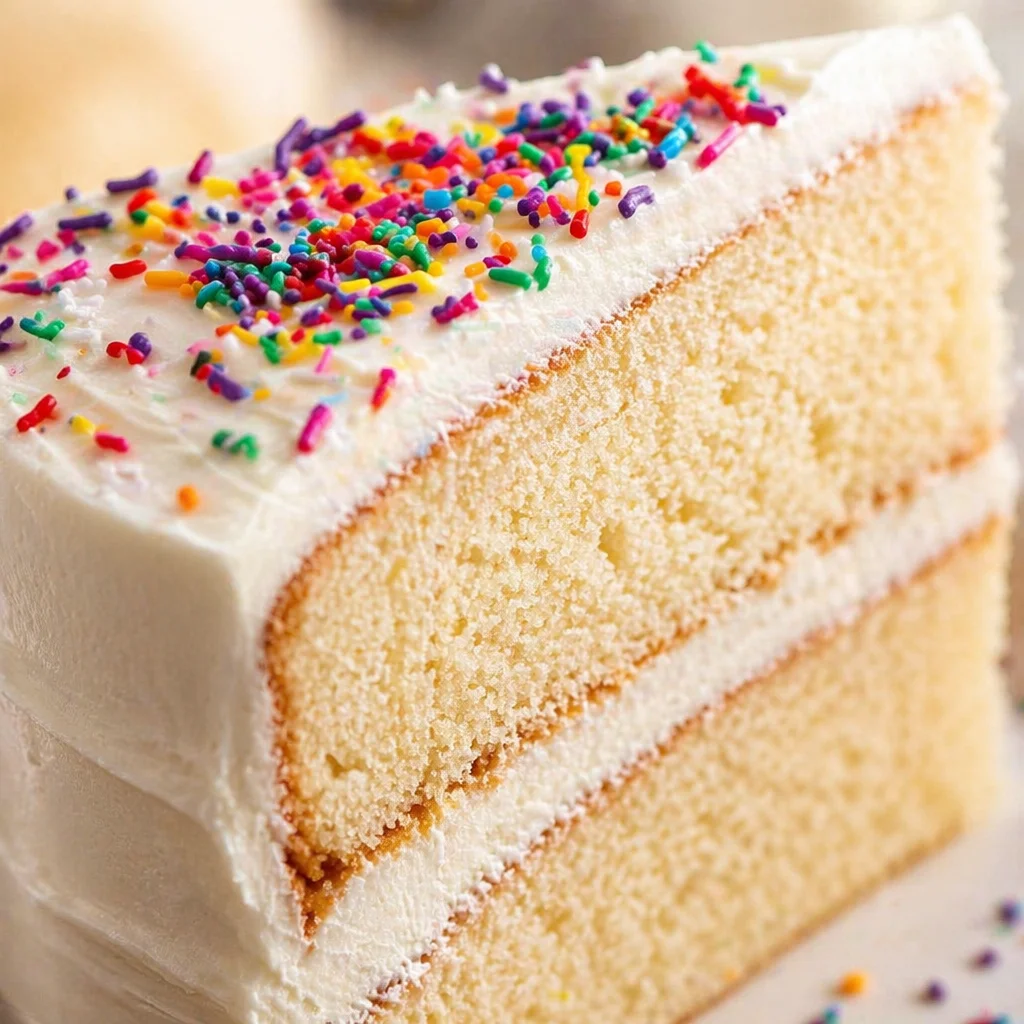
Divide the batter between your cake pans and smooth the tops. Bake 25 to 32 minutes for 8 inch layers, or about 30 to 38 minutes for a 9 by 13 pan. Your kitchen will start to smell like a cozy vanilla candle, except you get to eat it.
Check for doneness by inserting a toothpick into the center. If it comes out clean or with a couple of soft crumbs, it is ready. Let the cakes cool in the pans for 10 minutes, then turn them out onto a rack to cool completely.
Frosting idea: I love a simple vanilla buttercream or chocolate frosting. If you want something lighter, a whipped cream frosting works too, just keep it chilled.
;
Why This Vanilla Cake Recipe Works:
There are a lot of vanilla cakes out there, so I want to be clear about why this one consistently comes out right. It is not magic. It is just a few smart choices that help texture and flavor.
Butter plus a little oil gives you the best of both worlds. Butter brings that classic rich taste, and oil helps the crumb stay soft and moist even after the cake cools.
Milk adds tenderness and keeps the cake from feeling dry. It also helps the batter bake up evenly. This is especially helpful if your oven runs a little hot, which, honestly, many home ovens do.
A balanced amount of baking powder helps the cake rise without tasting bitter or collapsing in the middle. I tested this because I have had those sad cakes that puff up and then sink like they got embarrassed.
Vanilla is treated like the main character. Using a full tablespoon of vanilla extract gives the cake that true vanilla flavor that actually comes through after baking and frosting.
And since this is a vanilla cake from scratch, you control everything. No mystery mixes. No odd aftertaste. Just a simple cake that tastes like you meant to make it.
Common Questions
Q: Can I make this cake ahead of time?
A: Yes. Bake the layers, cool completely, wrap them tightly, and keep them at room temp for a day or freeze up to 2 months. Frost after thawing.
Q: What if I only have salted butter?
A: You can use it. Just reduce the added salt to about 1/4 teaspoon.
Q: Can I swap the milk for buttermilk?
A: Yep. Buttermilk makes it a little tangy and extra tender. Use the same amount, but the crumb may be slightly tighter in a good way.
Q: How do I keep the cake from sticking?
A: Grease the pans, add parchment circles on the bottom, and let the cake cool for about 10 minutes before turning out. If you wait too long, it can steam and stick.
Q: Why did my cake turn out dry?
A: Usually it is too much flour or too much baking time. Next time, spoon and level your flour, and start checking the cake a few minutes early.
A sweet little wrap up
If you have been chasing a vanilla cake that feels soft, tastes like real vanilla, and does not stress you out, this is the one I would hand you. Keep your ingredients close to room temp, measure the flour gently, and pull the cake as soon as it tests done. Once you try this vanilla cake from scratch, you will realize it is not complicated, it is just a few good steps done in a calm order. Bake it, frost it, and enjoy that first warm, vanilla scented bite. You have got this.
Vanilla Cake from Scratch
Ingredients
Method
- Heat your oven to 350°F (175°C). Grease your pans, line the bottoms with parchment, and lightly flour the sides.
- In a medium bowl, whisk the flour, baking powder, and salt together and set it aside.
- In a large bowl, beat the butter, oil, and sugar together until creamy.
- Add the eggs one at a time, mixing after each addition. Stir in the vanilla extract.
- Alternately add the dry ingredients and the milk in three parts, mixing gently until just combined.
- Divide the batter between your prepared cake pans and smooth the tops.
- Bake for 25 to 32 minutes for 8 inch layers, or about 30 to 38 minutes for a 9 by 13 pan.
- Cool in pans for 10 minutes, then turn out onto a rack to cool completely.
- Frost with vanilla buttercream, chocolate frosting, or whipped cream frosting as desired.
Notes

Name: Yumi HwagByline: Founder & Recipe Developer, YumimealsBio : Yumi tests weeknight-friendly air fryer, slow cooker, and BBQ recipes in a small home kitchen. She focuses on simple steps, real-family testing, and clear food-safety guidance. Contact: [email protected]