why make this recipe
A Vanilla Layer Cake is a timeless dessert that everyone loves. Its soft, light layers and sweet vanilla flavor make it perfect for any occasion, whether it’s a birthday, a wedding, or just a simple gathering with friends. This cake can be dressed up with various fillings and frostings, allowing you to personalize it to your taste. Moreover, mastering this recipe can enhance your baking skills, and everyone will be impressed by your homemade creation.
how to make Vanilla Layer Cake
To get started on the Vanilla Layer Cake, follow these simple directions.
Ingredients:
- 4 cups sugar
- 8 eggs
- 5 cups all-purpose flour
- 5 teaspoons baking powder
- 2 cups whole milk
- 2 cups unsalted butter (melted and cooled for about 45 seconds in the microwave)
- 1/2 cup oil
- 4 teaspoons vanilla bean paste (or vanilla extract)
- 4 egg yolks
- 1/2 cup sugar
- 1/4 cup cornstarch
- 1/4 teaspoon salt
- 2 cups whole milk (divided into 1/2 cup and 1-1/2 cups)
- 4 tablespoons unsalted butter
- 2 teaspoons vanilla bean paste (or vanilla extract)
- 2 cups sugar (separated into 1 cup each)
- 1/4 cup water
- 5 egg whites
- 1 pound 4 quarter sticks room temperature butter (not soft), cut into tablespoon pieces
- 3 teaspoons vanilla extract
- 3 cups strawberries and blueberries
- Powdered sugar to dust over the top of the cake
Preheat your oven to 350° (or 325° for dark pans). Prepare two 13×9 baking pans with baking spray and line them with parchment paper, spraying the parchment lightly for easy cake release.
In a large mixing bowl, combine the sugar and eggs, and beat them well.
Add in the flour, baking powder, milk, melted butter, oil, and vanilla. Mix until everything is smooth and fully blended.
Divide the batter evenly between the two prepared pans and bake for 35-40 minutes. A toothpick should come out clean when the cake is baked. Be sure to check every minute as needed to prevent overbaking.
Let the cakes cool for about 30 minutes, then remove them from the pans and transfer them to cooling racks until they cool completely.
For best results, bake the cakes a couple of days in advance and freeze them, which helps them stay moist and makes frosting easier. Wrap the cakes in plastic wrap and freeze on cardboard to maintain their shape.
When you’re ready to frost, let the cakes sit at room temperature for about 20 minutes before handling. Level the cakes if needed, and prepare the filling the day before so it’s nice and cold.
Make the pastry cream and Italian buttercream frosting right before using them.
how to serve Vanilla Layer Cake
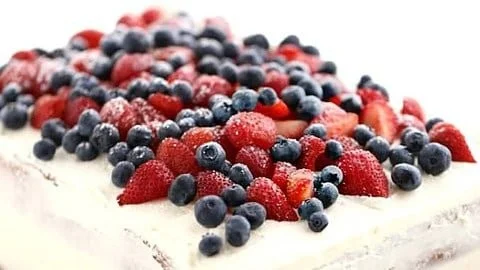
To serve the Vanilla Layer Cake, slice it into squares or rectangles, and you can serve it plain or topped with fresh strawberries and blueberries. A dusting of powdered sugar can add a lovely touch. This cake pairs wonderfully with coffee or tea.
how to store Vanilla Layer Cake
Store any leftover cake in an airtight container at room temperature for 1-2 days. If you need to keep it for longer, you can refrigerate it for up to a week. For extended storage, you can freeze individual slices of cake as well.
tips to make Vanilla Layer Cake
To ensure the best results with your Vanilla Layer Cake, consider these helpful tips:
- Use room temperature ingredients for better mixing.
- Sift your dry ingredients to avoid lumps.
- Don’t rush the baking process; keep an eye on your cakes towards the end of the baking time.
- Allow the cakes to cool completely before frosting them to maintain the structure.
variation
For a fun twist, you can add different flavors or fillings to your Vanilla Layer Cake. Consider adding layers of chocolate frosting, berries, or even lemon curd for a refreshing change.
FAQs
Q: Can I use a different flavor of extract?
A: Yes, you can experiment with almond, lemon, or any other flavor extract you like to customize the cake.
Q: How can I make the cake more moist?
A: Adding sour cream or yogurt can enhance the moisture of your cake.
Q: Can I make this cake as cupcakes?
A: Absolutely! Just adjust the baking time to about 18-20 minutes for cupcakes.
Conclusion
Baking a Vanilla Layer Cake is easier than you might think, and it offers endless customization options. If you want to explore more variations and tips, check out My very best Vanilla Cake – stays moist 4 days!, or learn about the Moist Vanilla Layer Cake Recipe for more ideas. For an inspiring take, visit The Best Vanilla Cake I’ve Ever Had for a delicious twist on this classic dessert.
Vanilla Layer Cake
Ingredients
Method
- Preheat your oven to 350° (or 325° for dark pans). Prepare two 13×9 baking pans with baking spray and line them with parchment paper, spraying the parchment lightly for easy cake release.
- In a large mixing bowl, combine the sugar and eggs, and beat them well.
- Add in the flour, baking powder, milk, melted butter, oil, and vanilla. Mix until everything is smooth and fully blended.
- Divide the batter evenly between the two prepared pans and bake for 35-40 minutes. A toothpick should come out clean when the cake is baked. Be sure to check every minute as needed to prevent overbaking.
- Let the cakes cool for about 30 minutes, then remove them from the pans and transfer them to cooling racks until they cool completely.
- For best results, bake the cakes a couple of days in advance and freeze them, which helps them stay moist and makes frosting easier. Wrap the cakes in plastic wrap and freeze on cardboard to maintain their shape.
- When you’re ready to frost, let the cakes sit at room temperature for about 20 minutes before handling. Level the cakes if needed, and prepare the filling the day before so it’s nice and cold.
- Make the pastry cream and Italian buttercream frosting right before using them.
- To serve the Vanilla Layer Cake, slice it into squares or rectangles, and you can serve it plain or topped with fresh strawberries and blueberries. A dusting of powdered sugar can add a lovely touch. This cake pairs wonderfully with coffee or tea.
Notes

Name: Yumi HwagByline: Founder & Recipe Developer, YumimealsBio : Yumi tests weeknight-friendly air fryer, slow cooker, and BBQ recipes in a small home kitchen. She focuses on simple steps, real-family testing, and clear food-safety guidance. Contact: [email protected]