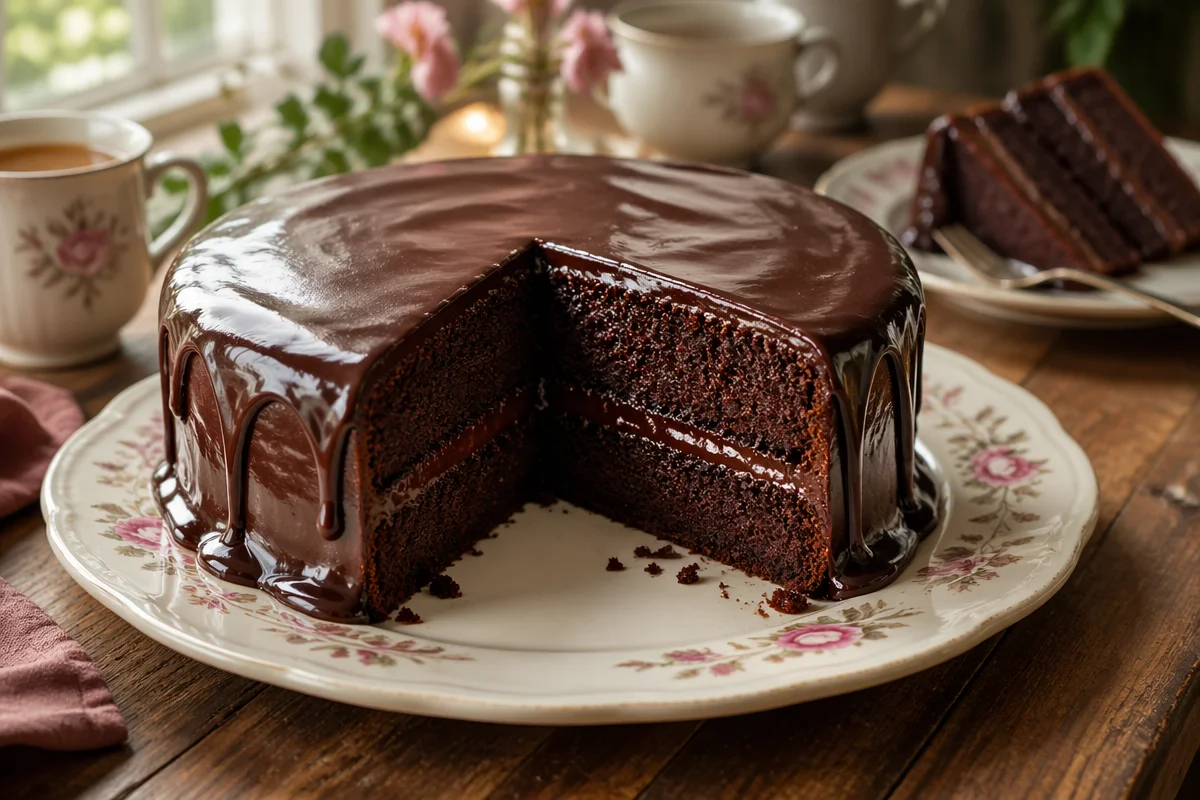
chocolate cake with ganache is the dessert I make when I need a sure win, like when friends are coming over last minute or I just had one of those weeks. You know that feeling when you want something homemade, but you also want it to look like it came from a bakery window? This cake does that without making you feel like you need a culinary degree. It bakes up soft and rich, then the ganache goes on like glossy chocolate magic. I have made it for birthdays, rainy Sundays, and one random Tuesday when I needed a mood boost. If you want a reliable, deeply chocolatey cake that makes people pause after the first bite, you are in the right place.
What is Ganache?
Ganache is basically chocolate and warm cream stirred together until it turns smooth and shiny. That is it. No fancy tricks, no weird ingredients, and no complicated steps.
People use ganache for all kinds of things, and once you learn it, you will spot it everywhere. It can be a glaze, a frosting, a filling, or even truffles if you let it firm up and roll it.
Here is the simple way I think about it:
More cream gives you a thinner ganache that drips and pours. Less cream makes a thicker ganache that spreads more like frosting.
For this cake, we are going for that dreamy middle ground where it’s thick enough to cling to the top, but still loose enough to drip down the sides in a satisfying way. When you pour it over a moist chocolate cake, it settles into a smooth, shiny layer that looks way more impressive than the effort it takes.
How to Make Chocolate Ganache
I used to think ganache was one of those “pastry chef only” things. Then I actually made it and felt a little silly for waiting so long. The key is using decent chocolate and not overheating anything.
My go to ganache ratio
For a drip and glaze style ganache, I like:
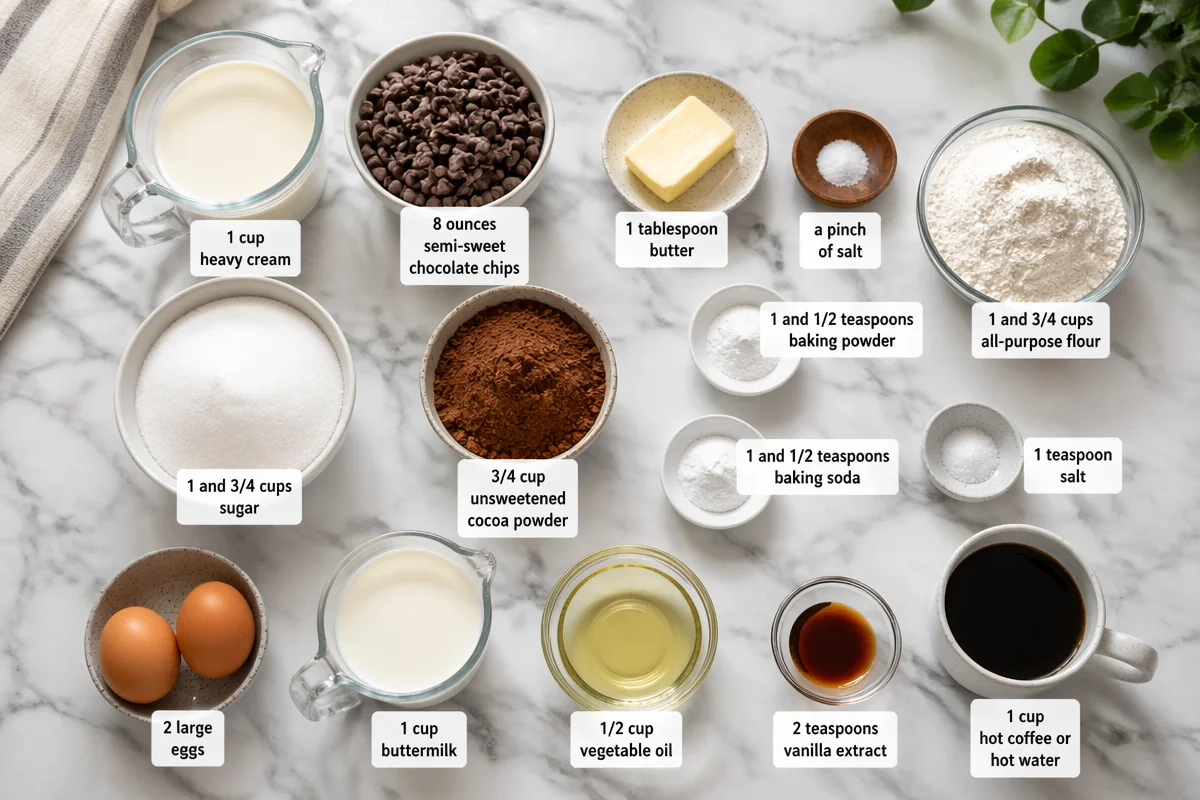
- 1 cup heavy cream
- 8 ounces semi sweet chocolate chopped or use good quality chips
- Optional: 1 tablespoon butter for extra shine
- Optional: a pinch of salt to make the chocolate taste louder
How I do it at home:
Warm the cream until it’s hot but not boiling. If you see lots of bubbles and it’s raging, you went a bit far. Pour the hot cream over the chocolate in a bowl. Let it sit for 2 minutes so the chocolate melts gently. Then stir slowly from the center outward until it turns glossy and smooth.
If it looks a little grainy, don’t panic. Usually it just needs a bit more gentle stirring. If your kitchen is cold and the chocolate is stubborn, microwave the bowl for 10 seconds, then stir again. Small bursts only.
Let the ganache cool for about 10 to 20 minutes before you pour it. Too hot and it runs right off the cake. Too cool and it turns into spreadable frosting, which is not a tragedy, just a different vibe.
Step-by-Step Instructions
This is the part where I talk to you like we are in the kitchen together. You do not need perfect skills here. You just need to follow the order and trust the process. This chocolate cake with ganache is forgiving, which is one reason I love it.
What you will need for the cake
- 1 and 3 quarter cups all purpose flour
- 1 and 3 quarter cups sugar
- 3 quarter cup unsweetened cocoa powder
- 1 and 1 half teaspoons baking powder
- 1 and 1 half teaspoons baking soda
- 1 teaspoon salt
- 2 large eggs
- 1 cup buttermilk room temp if you can
- 1 half cup vegetable oil
- 2 teaspoons vanilla extract
- 1 cup hot coffee or hot water if you hate coffee
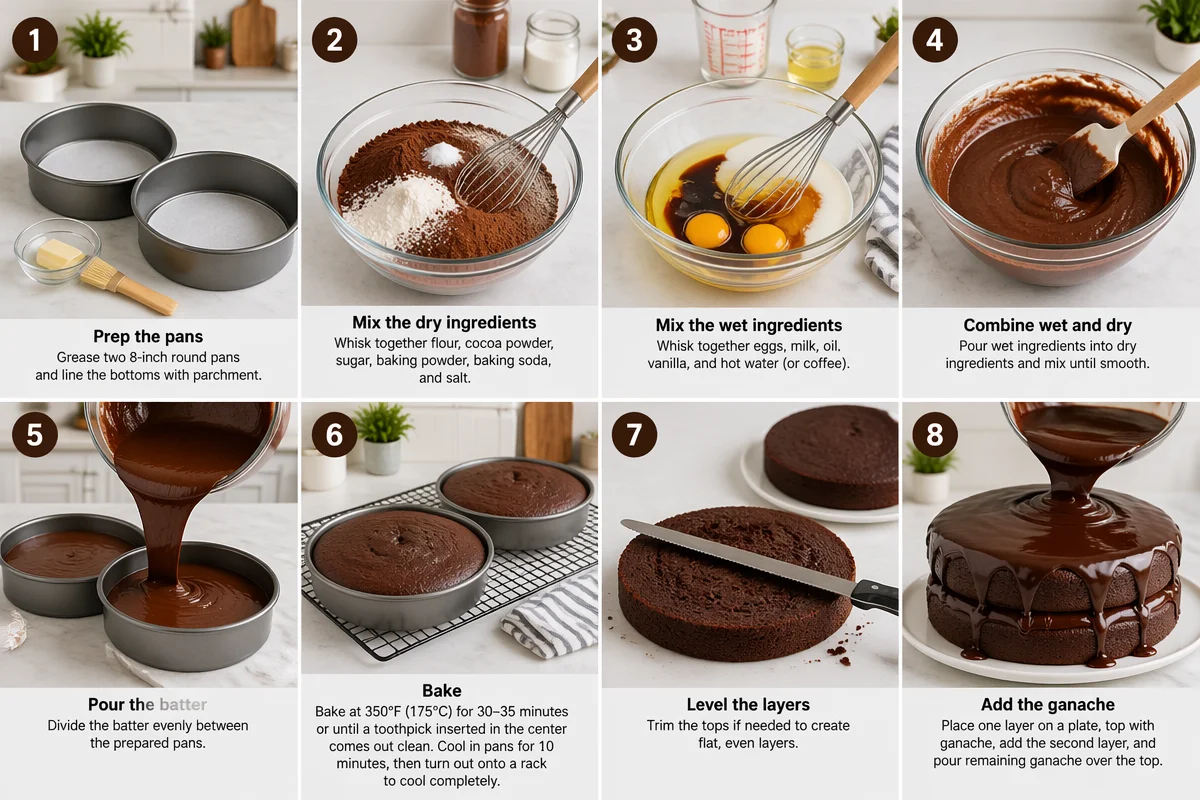
Step 1: Prep the pans and oven. Heat your oven to 350 F. Grease two 9 inch round pans and line the bottoms with parchment if you have it. Parchment is the little safety blanket that helps the cakes pop out cleanly.
Step 2: Mix the dry stuff. In a big bowl, whisk flour, sugar, cocoa, baking powder, baking soda, and salt. You are just trying to spread everything evenly so you do not get surprise salty bites.
Step 3: Add the wet ingredients. Add eggs, buttermilk, oil, and vanilla. Mix until the batter looks smooth. It will be thick at this stage.
Step 4: Pour in the hot coffee. Slowly pour in the hot coffee while mixing. The batter will get thin. That is exactly right. Coffee makes the chocolate taste deeper, not like mocha, just more chocolate. If you are skipping it, use hot water and a tiny extra pinch of salt.
Step 5: Bake. Divide batter between the pans. Bake about 30 to 35 minutes, or until a toothpick comes out with a few moist crumbs. Let the cakes cool in pans for 10 minutes, then turn them out onto a rack to cool completely.
Step 6: Level and stack. If the cakes have a dome, you can trim the top with a serrated knife once they are fully cool. I usually do a tiny trim and snack on the crumbs. Place one layer on your serving plate.
Step 7: Add a simple filling layer. You can do this two ways. If you want it super easy, spread a thin layer of cooled ganache between the layers. If you want it extra fluffy, use whipped ganache. To make whipped ganache, let your ganache cool until thick like pudding, then whip it with a mixer for 30 seconds to 1 minute until lighter in color.
Step 8: Pour the ganache on top. Put the stacked cake on a plate, and if you have space, set it on a baking sheet to catch drips. Pour ganache in the center and gently nudge it toward the edges with a spoon. Let it drip naturally. If you overwork it, it can look messy fast. A few imperfect drips actually look more natural and homemade in the best way.
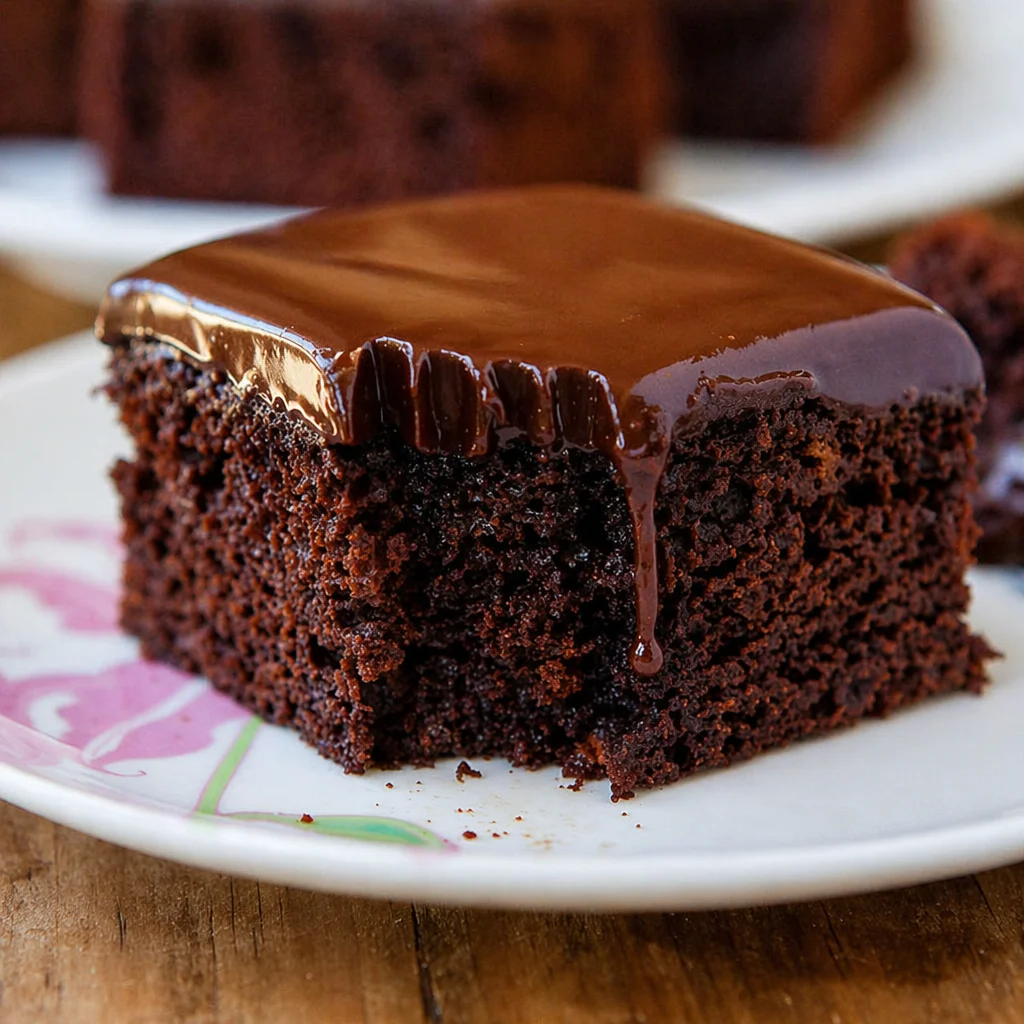
Once the ganache sets, slice and enjoy. The crumb should be soft, the chocolate flavor should feel bold, and the top should crack ever so slightly when your fork goes in.
How to Store Finished Cake
This cake stores better than most, which is great because it means you can make it ahead or keep leftovers without it turning sad and dry.
If you are keeping it for a day or two, I usually cover it and leave it at cool room temperature. If your kitchen is warm or humid, I suggest the fridge.
Here is what works best:
Room temperature: Cover the cake with a cake dome or wrap it loosely. It stays good for about 2 days.
Refrigerator: Cover well so it does not pick up fridge smells. It stays good about 4 to 5 days. Let slices sit out for 20 minutes before eating so the ganache softens again.
Freezer: Freeze slices wrapped in plastic wrap and then foil. They keep about 2 months. Thaw overnight in the fridge or for a couple hours at room temp.
One little note from experience: ganache can dull slightly in the fridge. It still tastes perfect, it just loses a bit of that fresh shine. If you care about looks for a party, add the final ganache layer the day you plan to serve.
Tips for Perfect Chocolate Drip
Drips are fun, but I know they can also be the stressful part. I have had ganache run right to the bottom like a chocolate waterfall, and I have also had it sit like a stubborn blob. These tips keep it in the sweet spot.
Quick drip fixes that actually help
Cool the cake completely. If the cake is even a little warm, the ganache melts and slides off.
Use the spoon test. Before you pour it on the cake, drizzle a little ganache down the side of a glass. If it runs too fast, wait 5 minutes and try again. If it barely moves, warm it for 5 to 10 seconds and stir.
Do a crumb coat if you want cleaner sides. This is optional, but you can spread a very thin layer of ganache over the whole cake first, chill it 15 minutes, then do your final pour. It helps the drip look smoother.
Start in the center. Pour in the middle and push it out slowly. If you pour right on the edge, you lose control and it can dump over in thick sheets.
Less is more. You can always add another spoonful. Taking it away is not really a thing.
Once you get the feel for it, it becomes kind of addictive. And honestly, even a messy drip still tastes like chocolate, so no one complains.
Common Questions
Q: Can I make this cake without coffee?
Yes. Use the same amount of hot water instead. The cake will still taste great, just a little less deep on the chocolate flavor.
Q: My ganache looks split or oily. What happened?
Usually the cream was too hot or the chocolate got overheated. Try stirring gently until it comes back together. If it is still broken, add 1 teaspoon of warm cream at a time and stir, it often smooths out.
Q: Can I use milk chocolate instead of semi sweet?
You can, but it will be sweeter and softer. If you use milk chocolate, reduce the cream a bit so the ganache does not get too runny.
Q: How do I know when the cake is done baking?
A toothpick should come out with a few moist crumbs, not wet batter. Also, the cake should spring back lightly when you tap the center.
Q: Can I bake this in a 9 by 13 pan?
Yes. Bake at 350 F and start checking around 30 minutes. You will likely land around 35 to 40 minutes depending on your pan. Then pour the ganache right over the top like a sheet cake. Easy and very satisfying.
A sweet last word before you bake
If you have been hunting for a dessert that feels special without being complicated, this chocolate cake with ganache is it. You get a moist, rich crumb, a shiny topping, and that bakery style wow moment when you slice in. Take your time with the cooling and the ganache thickness, and you will be in great shape. Make it once and it will probably become your go to celebration cake too. If you bake it, I hope you grab a warm drink, take a big bite, and enjoy your own little slice of heaven.
Chocolate Cake with Ganache
Ingredients
Method
- Preheat your oven to 350 F (175 C). Grease two 9-inch round pans and line the bottoms with parchment paper.
- In a large bowl, whisk together flour, sugar, cocoa powder, baking powder, baking soda, and salt.
- Add the eggs, buttermilk, vegetable oil, and vanilla extract to the dry ingredients. Mix until smooth.
- Slowly pour in the hot coffee while mixing the batter. It should become thin.
- Divide the batter evenly between the prepared pans.
- Bake for about 30 to 35 minutes, or until a toothpick comes out with a few moist crumbs. Let the cakes cool in the pans for 10 minutes before transferring them to a cooling rack.
- If the cake layers have domed tops, level them with a knife. Place one layer on your serving plate.
- Spread a thin layer of cooled ganache between the layers or use whipped ganache for a fluffier texture.
- Pour the ganache over the stacked cake, nudging it toward the edges. Let it drip naturally.
- Once the ganache sets, slice and enjoy.
Notes

Name: Yumi HwagByline: Founder & Recipe Developer, YumimealsBio : Yumi tests weeknight-friendly air fryer, slow cooker, and BBQ recipes in a small home kitchen. She focuses on simple steps, real-family testing, and clear food-safety guidance. Contact: [email protected]