ice cream cake recipe panic is real. You get invited to a birthday, you want something fun, and suddenly you are picturing melted ice cream puddles and a lopsided mess. I have been there, standing in my kitchen with a cookie crust in one hand and a dripping carton in the other. The good news is this is one of those desserts that looks fancy but is secretly pretty forgiving. If you can spread stuff into a pan and wait for the freezer to do its job, you can make this. Let me walk you through 5 simple ways to make it come out like the kind everyone goes back for.
Is It Hard to Make an Ice Cream Cake?
Honestly, no. The “hard” part is mostly timing, not skill. Think of this ice cream cake recipe as a build it, freeze it, decorate it situation. You do not need special tools, and you do not need to bake anything unless you really want to.
Here are the 5 simple ways that make it stress free and crowd pleasing every time:
1) Use a lined pan. Parchment or plastic wrap makes lifting and slicing so much easier. This one trick saves your edges from looking rough.
2) Choose one crunchy layer. Crushed cookies, brownie bits, or cereal add that classic texture. Too many crunchy things makes it hard to slice.
3) Soften, do not melt. Let ice cream sit 10 to 15 minutes so it spreads smoothly. If it turns soupy, it refreezes icy and sad.
4) Freeze between layers. Even 20 to 30 minutes helps keep clean stripes and prevents flavors from blending into a blur.
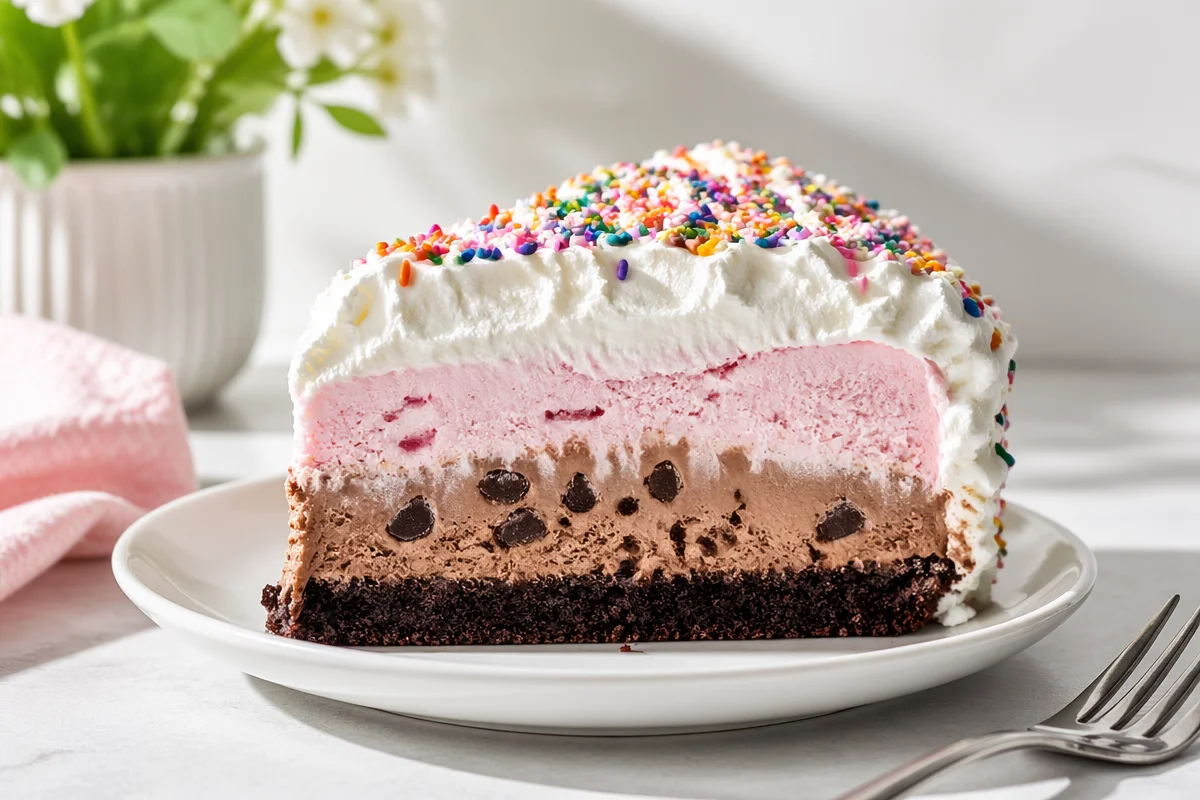
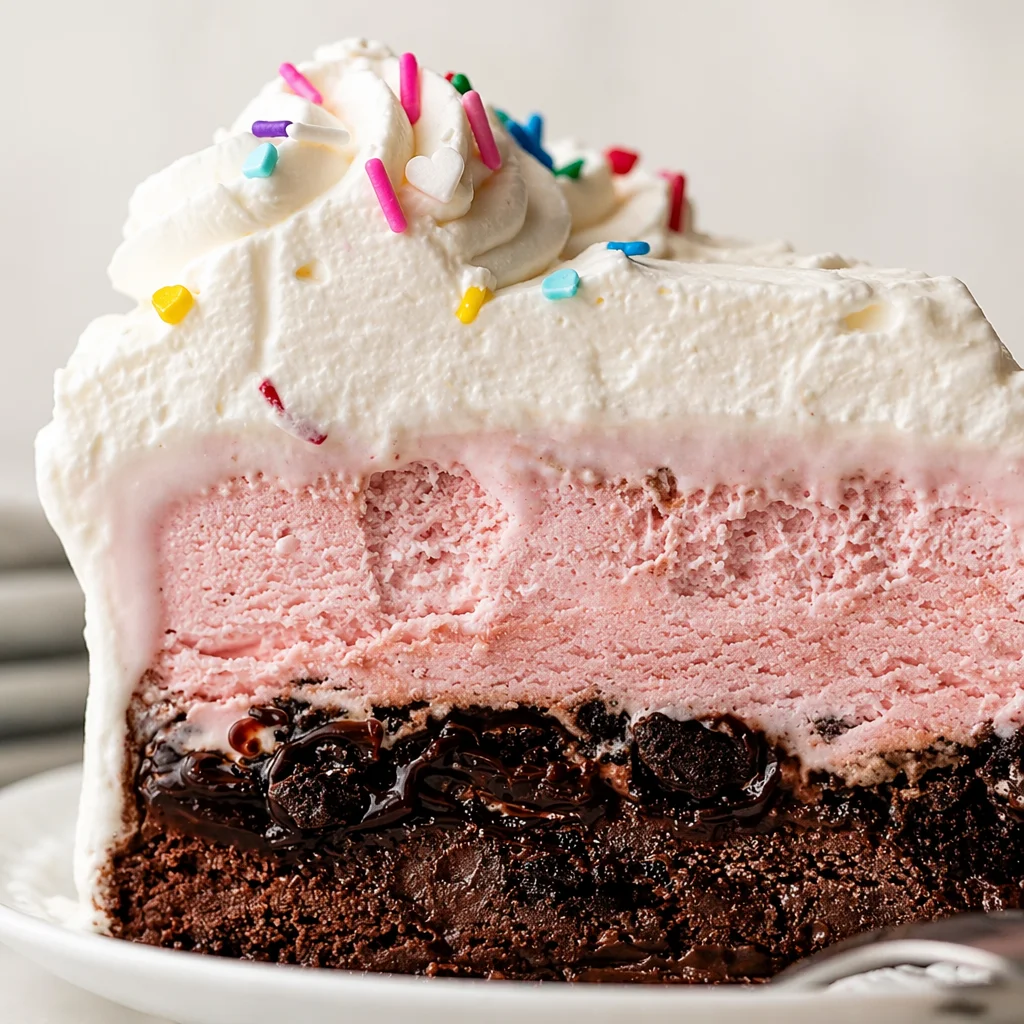
5) Keep toppings simple. Whipped topping, fudge drizzle, and sprinkles can go a long way. Overloading can make it collapse when you cut it.
If you are the kind of person who likes having a back up plan, I also keep extra whipped topping in the freezer. If the sides look messy, you can patch them like frosting spackle. Nobody will ever know.
What Youll Need
You can keep this super basic, or you can dress it up. This is my go to shopping list for a classic, everyone loves it version. Also, if you like baking projects, you might also enjoy my brownie base idea because a thin brownie layer under ice cream is ridiculously good.
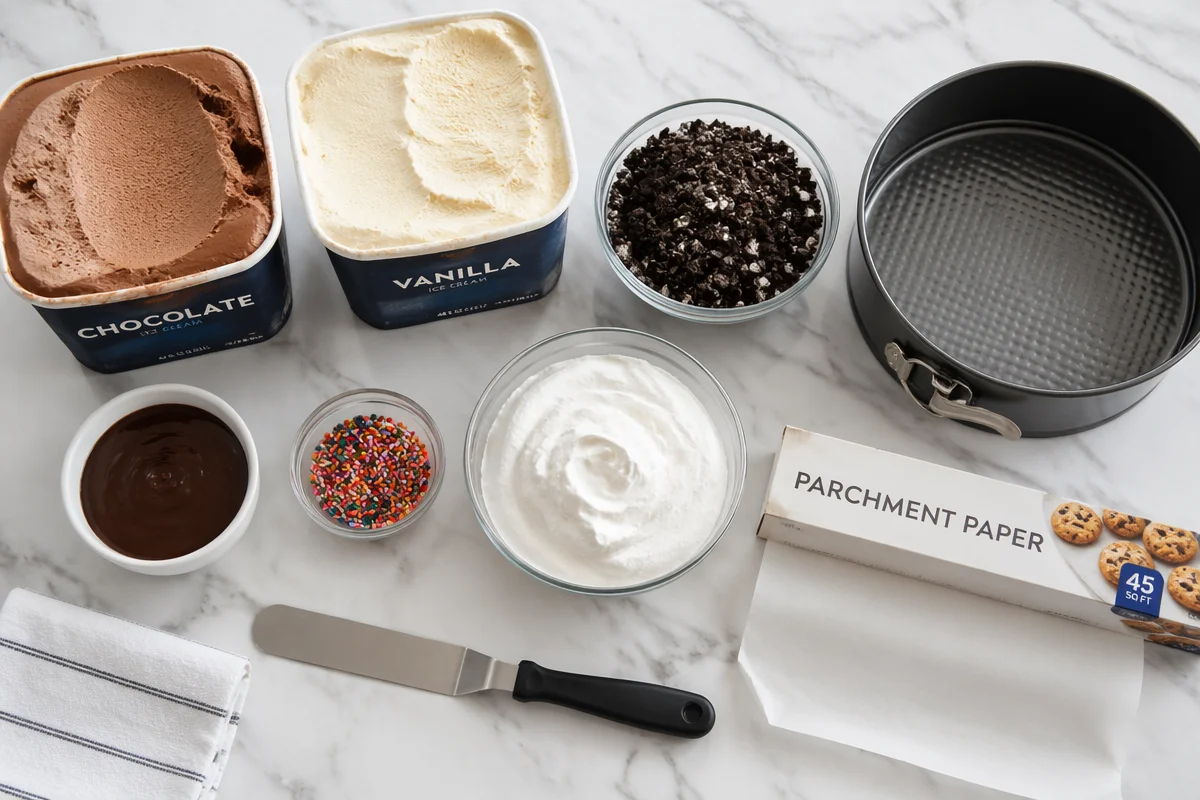
- Ice cream: 2 to 3 pints total, usually two flavors (like chocolate and vanilla)
- Crunchy layer: crushed chocolate sandwich cookies, about 2 to 3 cups
- Fudge sauce: store bought or homemade, about 3 to 4 tablespoons
- Whipped topping or whipped cream: 2 to 3 cups
- Sprinkles or mini chocolate chips: optional, but fun
- A 9 inch springform pan or a loaf pan
- Parchment paper or plastic wrap
- Offset spatula or the back of a spoon
;
A quick note on the pan: a springform pan gives you those clean bakery style sides, but a loaf pan is perfect if you want tall slices. I have used both and nobody complained either way.
How to Make An Ice Cream Cake
This is the part where it feels like you are assembling a delicious little construction project. The key is working in short bursts so nothing melts too much. I usually clear a space in my freezer first, because trying to wedge a soft cake behind frozen peas is not the vibe.
Step by step layering method
1) Line your pan. Let the parchment hang over the sides if you can. That gives you handles later.
2) Make the crunch layer. Mix crushed cookies with a spoonful of fudge sauce, just enough to make it clump slightly. Press it into the bottom of the pan. Freeze it for 10 minutes.
3) Spread your first flavor. Let the ice cream soften for 10 to 15 minutes, then spread half of it over the crust. Tap the pan on the counter to remove air pockets. Freeze for 30 minutes.
4) Add a thin fudge layer. Drizzle a little fudge sauce over the frozen ice cream and gently spread it. Do not go too thick or it will freeze like a rock.
5) Add the second flavor. Spread the remaining ice cream on top. Freeze for at least 4 hours, but overnight is even better.
6) Frost the outside. Remove from the pan, then cover with whipped topping. Smooth the sides, add sprinkles, and return to the freezer for 30 minutes so it sets.
If you want a little extra guidance on toppings and easy decorating, I have a simple sprinkle and sauce guide here: favorite ice cream cake toppings. It is basically my cheat sheet for making it look party ready fast.
When you are ready to serve, let it sit on the counter for 5 to 10 minutes. That small wait makes slicing so much cleaner and keeps you from fighting a frozen brick.
How to Store
Homemade ice cream cake disappears fast, but if you do have leftovers, storing it the right way keeps it from tasting like freezer air. You know that weird freezer smell that clings to everything? We are avoiding that.
Here is what works for me:
Short term: Cover the whole cake tightly with plastic wrap, then a layer of foil. Keep it in the coldest part of your freezer.
Longer term: Slice it, then wrap individual pieces. I like wrapping each slice in plastic wrap and storing them in a freezer bag. This is perfect for sneaking a slice on a random Tuesday.
How long it keeps: It is best within 7 to 10 days for taste and texture. After that it is still safe, but it can get icy.
Serving tip: Use a long knife dipped in hot water, then wipe it dry between cuts. It makes those slices look neat even if your layers are not perfectly straight.
How to Customize Your Homemade Ice Cream Cake
This is where you can make your ice cream cake recipe feel personal, like it was made just for whoever is blowing out candles. I love customizing because it takes the same base method and makes it feel brand new.
Easy flavor combos people actually get excited about
Cookies and cream plus chocolate: Always a hit, very classic.
Strawberry plus vanilla: Tastes like a strawberry shortcake vibe if you add crushed golden cookies.
Mint chip plus fudge: Add brownie bits for extra wow.
Coffee plus chocolate: Great for adults, especially with toffee bits.
You can also swap the crust and crunch layer:
Brownie base: Bake a thin brownie in the pan, cool completely, then freeze before adding ice cream.
Pretzel crust: Salty and sweet, especially good with caramel drizzle.
Rice cereal crunch: Mix cereal with a little melted chocolate and press it in. This gives that nostalgic crunch.
If you need a dairy free option, use dairy free ice cream and coconut whipped topping. The method is the same, just be extra strict about freezing between layers because some dairy free brands soften faster.
Common Questions
Can I make this ice cream cake recipe without a springform pan?
Yes. A loaf pan works great. Just line it really well so you can lift it out.
Why did my layers get icy?
Usually the ice cream got too melted before freezing, or it sat uncovered. Keep it covered and only soften until spreadable.
How far ahead can I make it?
I like making it 1 to 3 days ahead. That gives it time to set firmly and saves you party day stress.
What is the best crunchy layer that stays crunchy?
Cookie crumbs mixed with a little fudge sauce holds up well. If you add plain cookies directly on ice cream, they can soften.
How do I slice it neatly for a party?
Hot water knife trick, wipe between cuts, and let the cake sit out 5 to 10 minutes first.
A Sweet Finish and A Little Push to Try It
If you take anything from this post, let it be this: a great ice cream cake recipe is mostly about simple layers, a little patience, and not overthinking it. Line the pan, soften the ice cream just enough to spread, and freeze between steps so everything stays tidy. Once you make it once, it feels almost too easy, and suddenly you are the person who brings the fun dessert.
If you want more inspiration, I really like how Homemade Ice Cream Cake (Like Dairy Queen) – Sally’s Baking breaks down the classic texture, and this Copycat Dairy Queen Ice Cream Cake – Life Love and Sugar is great if you are chasing that nostalgia on purpose. Now go clear a little freezer space and make your own, because you are absolutely capable of pulling this off.
Ice Cream Cake
Ingredients
Method
- Line your pan with parchment paper or plastic wrap, letting it hang over the sides for easy removal.
- Make the crunch layer by mixing crushed cookies with a spoonful of fudge sauce and pressing it into the bottom of the pan. Freeze for 10 minutes.
- Let the ice cream soften for 10 to 15 minutes, then spread half of it over the crust. Tap the pan on the counter to remove air pockets. Freeze for 30 minutes.
- Drizzle a little fudge sauce over the frozen ice cream and gently spread it without making it too thick.
- Spread the remaining ice cream on top and freeze for at least 4 hours, preferably overnight.
- Remove from the pan and frost the outside with whipped topping. Smooth the sides and add sprinkles, returning to the freezer for 30 minutes to set.
Notes

Name: Yumi HwagByline: Founder & Recipe Developer, YumimealsBio : Yumi tests weeknight-friendly air fryer, slow cooker, and BBQ recipes in a small home kitchen. She focuses on simple steps, real-family testing, and clear food-safety guidance. Contact: [email protected]