What if you could capture the entire spirit of the holidays in one creamy, decadent spoonful? Forget dense fruitcakes and complicated cookies. This year, the answer to your festive dessert dreams lies in these unbelievably simple and elegant Eggnog Pudding Cups. They are a game-changer for holiday entertaining.
This recipe transforms the classic holiday beverage into a velvety, rich pudding. It’s a sophisticated dessert that feels incredibly special yet is surprisingly easy to make. Get ready to wow your guests with a treat that tastes like pure, spiced comfort and joy. This is the ultimate guide to creating perfect eggnog pudding every time.
Ingredients List
The magic of this recipe lies in its simple, high-quality ingredients. Each one plays a crucial role in creating the perfect texture and flavor. Don’t be afraid to make small swaps to suit your pantry or preferences!
- Full-Fat Eggnog: 2 cups. The star of the show! A quality, thick, store-bought or homemade eggnog provides the foundational flavor. For a richer taste, look for one with a higher cream content.
- Whole Milk: 1 cup. This helps balance the richness of the eggnog, creating a perfectly smooth consistency. You can substitute with 2% milk, but whole milk is recommended for creaminess.
- Granulated Sugar: 1/2 cup. This provides the sweetness. You can adjust this amount slightly based on the sweetness of your eggnog.
- Cornstarch: 1/4 cup. The primary thickening agent that makes this a “pudding.” It ensures a stable, spoonable texture without the fuss of a traditional baked custard.
- Large Egg Yolks: 4. These add incredible richness, color, and a velvety mouthfeel that cornstarch alone cannot achieve. Save the whites for an angel food cake or omelet!
- Unsalted Butter: 2 tablespoons, cut into small pieces. Stirred in at the end, butter adds a final touch of silkiness and flavor.
- Pure Vanilla Extract: 1 teaspoon. This enhances all the other flavors in the pudding.
- Ground Nutmeg: 1/2 teaspoon, plus more for garnish. Freshly grated nutmeg offers a much more aromatic and potent flavor than pre-ground.
- Pinch of Salt: Just a small pinch to balance the sweetness and elevate the spiced notes.
Timing
This dessert is ideal for making ahead, with most of the time being completely hands-off. The active preparation is remarkably quick, freeing you up during busy holiday moments. Based on our tests, the total hands-on time is under 30 minutes.
- Prep Time: 15 minutes
- Cook Time: 10-15 minutes
- Chill Time: At least 4 hours, but preferably overnight
- Total Time: Approximately 4 hours and 30 minutes
This schedule makes it a perfect dessert to prepare the day before a party. This efficiency means you spend less time in the kitchen and more time with your loved ones, a key goal for any holiday recipe.
Step-by-Step Instructions
Follow these steps carefully for a foolproof, silky-smooth pudding. The key to success is preparation and constant whisking during the cooking process. Have all your ingredients measured and ready to go before you begin.
Step 1: Combine Dry Ingredients and Eggnog Base
In a medium saucepan, whisk together the granulated sugar, cornstarch, and salt. Breaking up any lumps now is crucial for a smooth final product. Gradually pour in the eggnog and whole milk, whisking continuously until the mixture is completely smooth and the cornstarch has dissolved.
Step 2: Temper the Egg Yolks
Place the 4 egg yolks in a separate medium-sized bowl and whisk them lightly. Place the saucepan with the eggnog mixture over medium heat. Cook, whisking constantly, until the mixture begins to bubble gently and thicken slightly, about 6-8 minutes.
Once warm, slowly pour about one cup of the hot eggnog mixture into the egg yolks while whisking the yolks vigorously. This is called tempering. It gently raises the temperature of the eggs, preventing them from scrambling when added to the hot pot. This is the most critical step for a creamy custard.
Step 3: Cook the Pudding
Pour the tempered egg yolk mixture back into the saucepan with the remaining eggnog base. Continue to cook over medium heat, whisking constantly. Be sure to scrape the bottom and corners of the pan. The pudding will thicken significantly. Cook for another 2-3 minutes until it’s thick enough to coat the back of a spoon.
Step 4: Add the Finishing Touches
Remove the saucepan from the heat. Immediately whisk in the pieces of butter, the vanilla extract, and the 1/2 teaspoon of ground nutmeg. Continue whisking until the butter has fully melted and is incorporated into the pudding, making it glossy and smooth. These final additions elevate the flavor of your Eggnog Pudding Cups.
Step 5: Strain for a Silky Texture (Optional but Recommended)
For an absolutely flawless, restaurant-quality texture, strain the pudding through a fine-mesh sieve into a clean bowl. This will catch any small bits of cooked egg or undissolved cornstarch that may have formed. This single step is the secret to an incredibly silky mouthfeel.
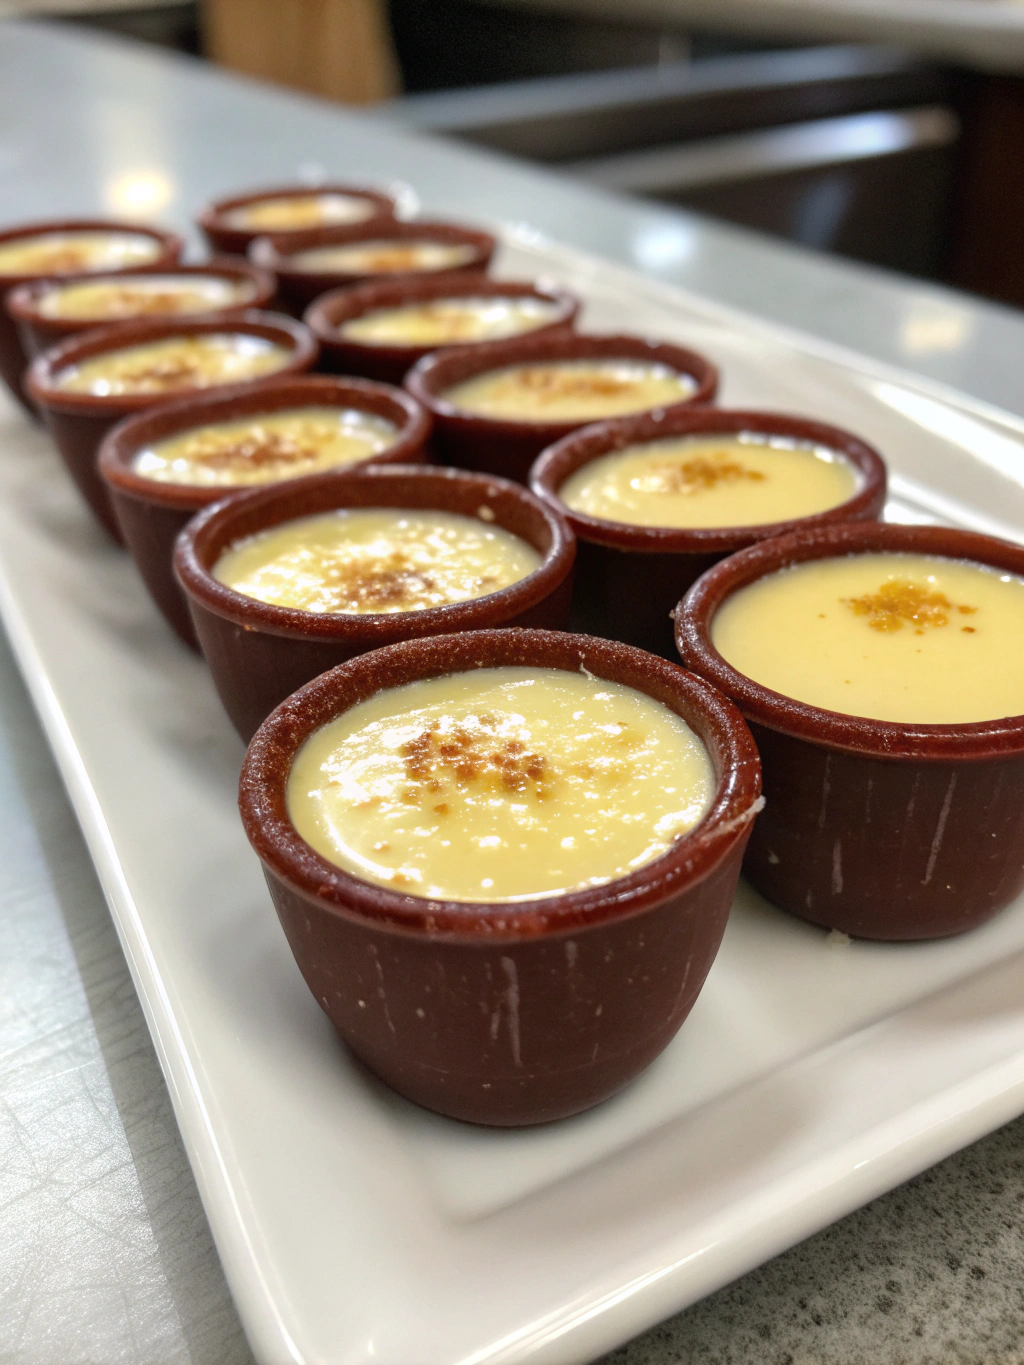
Step 6: Portion and Chill
Pour the strained pudding evenly into 4-6 small serving dishes, ramekins, or glass cups. To prevent a skin from forming on top, press a piece of plastic wrap directly onto the surface of each pudding. Chill in the refrigerator for at least 4 hours, or until completely firm. Overnight is even better for the flavors to meld.
Nutritional Information
While this is an indulgent treat, understanding its nutritional profile can help with mindful enjoyment. The following is an estimate for one serving, assuming the recipe makes 6 portions. Values can vary based on the specific brands of eggnog and milk used.
- Calories: Approximately 320 kcal
- Fat: 18g
- Carbohydrates: 35g
- Sugars: 28g
- Protein: 6g
This dessert is a rich source of calcium from dairy. The majority of calories come from carbohydrates (sugar) and fats, making it a true holiday indulgence best enjoyed in moderation.
Healthier Alternatives for the Recipe
Love the idea but need to fit it into a specific dietary plan? These Eggnog Pudding Cups are wonderfully adaptable. With a few simple swaps, you can create a version that suits your needs without sacrificing that festive flavor.
- Lower-Fat Version: Use low-fat or skim milk and a “light” or low-fat eggnog. This will reduce the overall calorie and fat content. The texture may be slightly less rich but still delicious.
- Dairy-Free & Vegan Version: Swap whole milk for oat milk or cashew milk for creaminess. Use a high-quality dairy-free eggnog (often almond or coconut-based). Replace the butter with a vegan butter substitute or coconut oil. Note: This version will not use egg yolks, so you may need to increase cornstarch to 1/3 cup to achieve proper thickness.
- Reduced Sugar: You can reduce the granulated sugar to 1/3 cup, especially if your eggnog is already very sweet. Alternatively, substitute with maple syrup (use slightly less) or a granulated sugar alternative like erythritol for a lower-glycemic option.
Serving Suggestions
Presentation transforms this simple pudding into a show-stopping dessert. A little garnish goes a long way in making your Eggnog Pudding Cups look as good as they taste. Here are a few ideas to inspire you:
- Classic Garnish: Top with a dollop of fresh whipped cream (or coconut cream) and a final dusting of freshly grated nutmeg or cinnamon right before serving.
- A Touch of Crunch: Sprinkle crushed gingersnap cookies, shortbread crumbles, or candied pecans over the top for a delightful textural contrast.
- Parfait Style: Layer the pudding in clear glasses with crushed cookies and whipped cream to create beautiful, festive parfaits.
- Spiked for Adults: For an adult-only version, you can fold in 1-2 tablespoons of dark rum, brandy, or bourbon along with the vanilla extract in Step 4.

Name: Yumi Hwag
Byline: Founder & Recipe Developer, Yumimeals
Bio : Yumi tests weeknight-friendly air fryer, slow cooker, and BBQ recipes in a small home kitchen. She focuses on simple steps, real-family testing, and clear food-safety guidance. Contact: [email protected]