
Have you ever wondered how to transform those nostalgic Little Debbie Christmas Tree Cakes into something even more extraordinary for your holiday gatherings? Imagine the delight on your guests’ faces when you present them with Christmas tree cake truffles that combine the beloved flavors of those iconic tree-shaped treats with rich, creamy cheesecake. These bite-sized wonders bring together the best of both worlds – the festive charm of Christmas tree cakes and the luxurious indulgence of cheesecake in one perfect, poppable dessert that’s sure to become a new holiday tradition.
Ingredients List
- 6 Little Debbie Christmas Tree Cakes, unwrapped
- 8 oz cream cheese, softened to room temperature
- 1/4 cup powdered sugar, sifted
- 1/2 tsp vanilla extract
- 1/4 tsp almond extract (optional, for enhanced flavor)
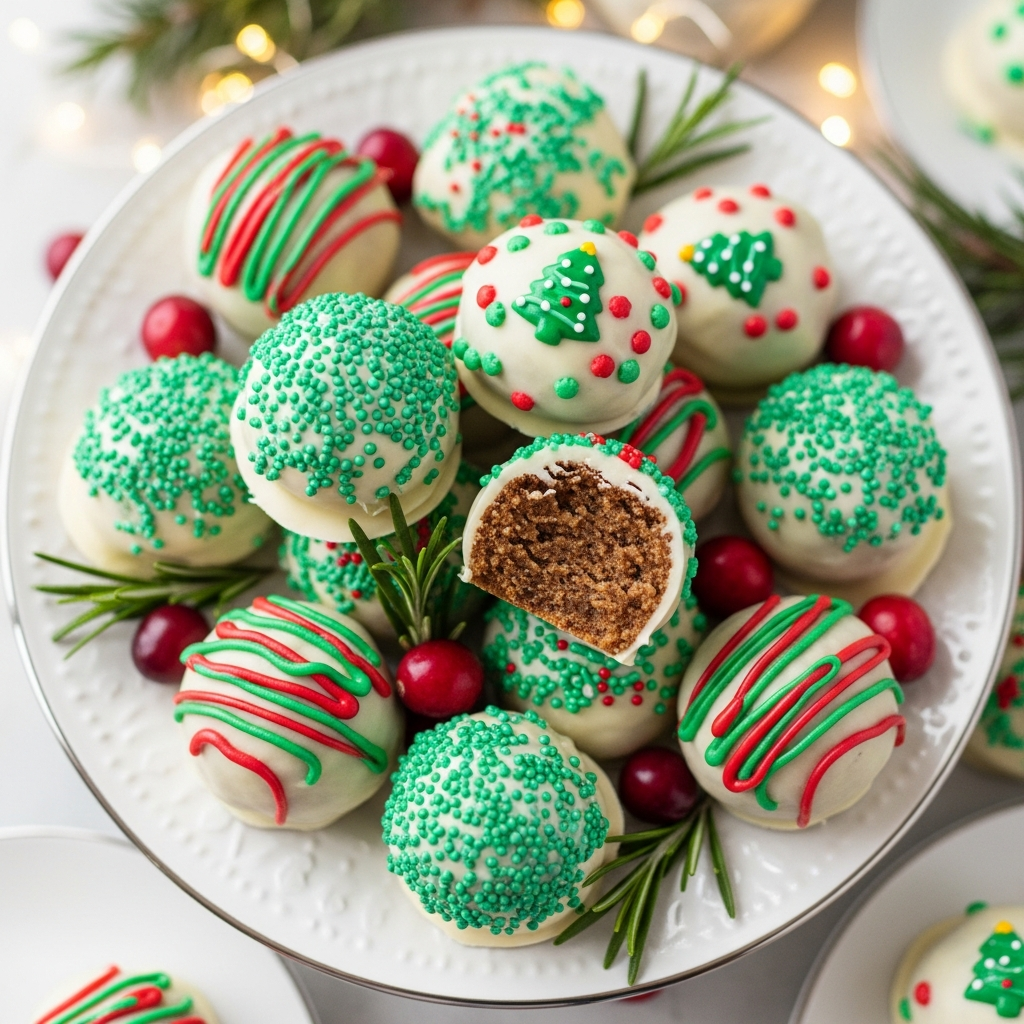
- 12 oz white chocolate or white candy melts
- 2 tbsp coconut oil or shortening (to thin chocolate for dipping)
- Green candy melts or food coloring (for decoration)
- Assorted sprinkles, mini M&Ms, or edible pearls for decoration
- Red candy melts for drizzle “garland” (optional)
Substitutions:
- For cream cheese: Mascarpone creates an even richer texture
- For white chocolate: White almond bark or high-quality white baking chips
- For Little Debbie cakes: Any similar vanilla holiday cake can work in a pinch
Timing
Prep Time: 30 minutes (includes crushing cakes and mixing filling)
Chill Time: 2 hours minimum (can be prepared a day ahead)
Decorating Time: 45 minutes
Total Time: 3 hours 15 minutes (mostly inactive chilling time)
These delightful holiday cheesecake bites, Little Debbie desserts, festive treats save you nearly an hour compared to baking a traditional cheesecake, while still delivering that luxurious flavor everyone craves during the holidays.
Step-by-Step Instructions
Step 1: Prepare the Cake Base
Break the Christmas Tree Cakes into small pieces and place them in a food processor. Pulse until you have fine crumbs. If you don’t have a food processor, place cakes in a zip-top bag and crush with a rolling pin until fine crumbs form. Transfer to a large mixing bowl.
Pro Tip: Leave a few small chunks for texture variation that creates bursts of cake flavor in each bite.
Step 2: Create the Cheesecake Mixture
In a separate bowl, beat the softened cream cheese until smooth and fluffy, about 2 minutes. Add the powdered sugar, vanilla extract, and almond extract (if using). Beat until completely combined and silky smooth.
Pro Tip: Make sure your cream cheese is truly at room temperature (at least 30 minutes on the counter) for the smoothest results and to avoid lumps.
Step 3: Combine and Form the Truffles
Add the cream cheese mixture to the cake crumbs. Using a spatula or clean hands, mix until fully incorporated into a thick, moldable dough. Scoop about 1 tablespoon of mixture and roll between your palms to form balls. Place on a parchment-lined baking sheet.
Pro Tip: Use a small cookie scoop for uniform size, which ensures even freezing and consistent appearance.
Step 4: Chill the Truffle Bases
Place the baking sheet in the refrigerator and chill for at least 2 hours, or in the freezer for 30 minutes. This firms up the truffles so they hold their shape during dipping.
Pro Tip: If you’re in a hurry, 15 minutes in the freezer will work, but be careful not to freeze them solid as the chocolate coating may crack.
Step 5: Prepare the Coating
In a microwave-safe bowl, combine white chocolate and coconut oil. Microwave in 30-second intervals, stirring between each, until completely melted and smooth. If making green trees, divide the chocolate and add green candy melts or oil-based food coloring to one portion.
Pro Tip: Adding coconut oil creates a thinner consistency that’s perfect for dipping and gives a smoother finish to your truffles.
Step 6: Dip and Decorate
Remove truffles from the refrigerator. Using a fork or dipping tool, dip each truffle into the melted chocolate, allowing excess to drip off. Return to parchment paper. Immediately add sprinkles while the coating is still wet. For tree designs, drizzle with contrasting colors to create garlands or ornaments.
Pro Tip: Work with just 4-5 truffles at a time, keeping the rest chilled, for the best dipping results.
Nutritional Information
Per serving (1 truffle):
- Calories: 175
- Protein: 2g
- Carbohydrates: 18g
- Fat: 11g
- Fiber: 0.5g
- Sugar: 15g
These values are approximate and may vary based on specific brands used.
Healthier Alternatives for the Recipe
- Lower Fat Version: Use Neufchâtel cheese (1/3 less fat than cream cheese) and Greek yogurt cream cheese blend
- Reduced Sugar Option: Use sugar-free white chocolate and reduce powdered sugar to 2 tablespoons
- Gluten-Free Version: Substitute gluten-free vanilla cakes for the Little Debbie cakes
- Vegan Adaptation: Use dairy-free cream cheese, vegan white chocolate, and vegan vanilla cakes
Serving Suggestions
- Arrange on a multi-tiered serving platter with pine branches for a festive display
- Pair with hot cocoa or peppermint mochas for a delightful dessert experience
- Serve alongside fresh berries for a color contrast and flavor balance
- For elegant presentations, place each truffle in a mini cupcake liner and arrange on a mirrored tray
Common Mistakes to Avoid
- Rushing the Chilling Process: Inadequate chilling leads to truffles that fall apart during dipping
- Overheating Chocolate: This causes it to seize or become grainy; use low heat and patience
- Too Much Moisture: Excess liquid in the mixture makes shaping difficult; add more cake crumbs if needed
- Coating Too Thick: Apply a thin, even layer of chocolate for the best texture and appearance
Storing Tips for the Recipe
- Refrigeration: Store in an airtight container for up to 1 week; separate layers with parchment paper
- Freezing: These truffles freeze beautifully for up to 3 months; thaw in refrigerator overnight
- Make-Ahead Strategy: Prepare the truffle bases up to 3 days ahead and store in the refrigerator; dip in chocolate the day of serving
- Room Temperature Serving: Remove from refrigerator 20 minutes before serving for optimal flavor and texture
Conclusion
These Christmas Tree Cake Cheesecake Bites combine nostalgia with elegant indulgence, creating a dessert that’s perfect for holiday gatherings, cookie exchanges, or thoughtful homemade gifts. The beautiful balance of cake, cheesecake, and chocolate coating delivers a luxurious taste experience in a perfectly portioned bite. Whether you’re looking to impress guests or simply treat yourself to something special this season, these festive truffles are sure to bring joy to your holiday celebrations. Try them today and watch them become a requested favorite year after year!
FAQs
Can I make these with other flavors of Little Debbie cakes?
Absolutely! These work wonderfully with any Little Debbie seasonal cakes. Try Valentine Hearts, Easter Cakes, or even Zebra Cakes for year-round variations.
Why did my chocolate coating crack after setting?
Cracking typically occurs when the truffles are too cold when dipped. Let them warm slightly from frozen, or use room temperature chocolate with a bit more coconut oil for flexibility.
Can I make these ahead for a party?
Yes! Make them up to 3 days in advance and store in the refrigerator. The flavor actually improves after the first day as the ingredients meld together.
How can I get a smoother finish on my truffles?
For professional-looking truffles, double-dip them. Apply a thin first coat, let set for 10 minutes, then dip again for a flawless finish.
Are these suitable for shipping as gifts?
These truffles ship well in cool weather. Pack them with ice packs in an insulated container, and ship overnight or 2-day for best results.

Name: Yumi Hwag
Byline: Founder & Recipe Developer, Yumimeals
Bio : Yumi tests weeknight-friendly air fryer, slow cooker, and BBQ recipes in a small home kitchen. She focuses on simple steps, real-family testing, and clear food-safety guidance. Contact: [email protected]