Are you tired of the same old Christmas cookies and predictable pies year after year? What if you could create a show-stopping festive dessert that requires less baking stress but delivers ten times the wow factor? This holiday season, it’s time to embrace one of the most brilliant Christmas Dessert Platter Ideas. A dessert board is not just a collection of sweets; it’s an interactive, visually stunning experience that becomes the centerpiece of your celebration. It’s a trend that’s here to stay, with data showing a 150% increase in searches for “dessert charcuterie boards” during the holidays.
Forget being stuck in the kitchen. A well-planned Christmas dessert platter allows you to mix store-bought convenience with homemade charm. This guide will walk you through everything you need to know, from selecting the perfect components to arranging them like a pro. Get ready to create a masterpiece that your family and friends will be talking about long after the last crumb is gone.
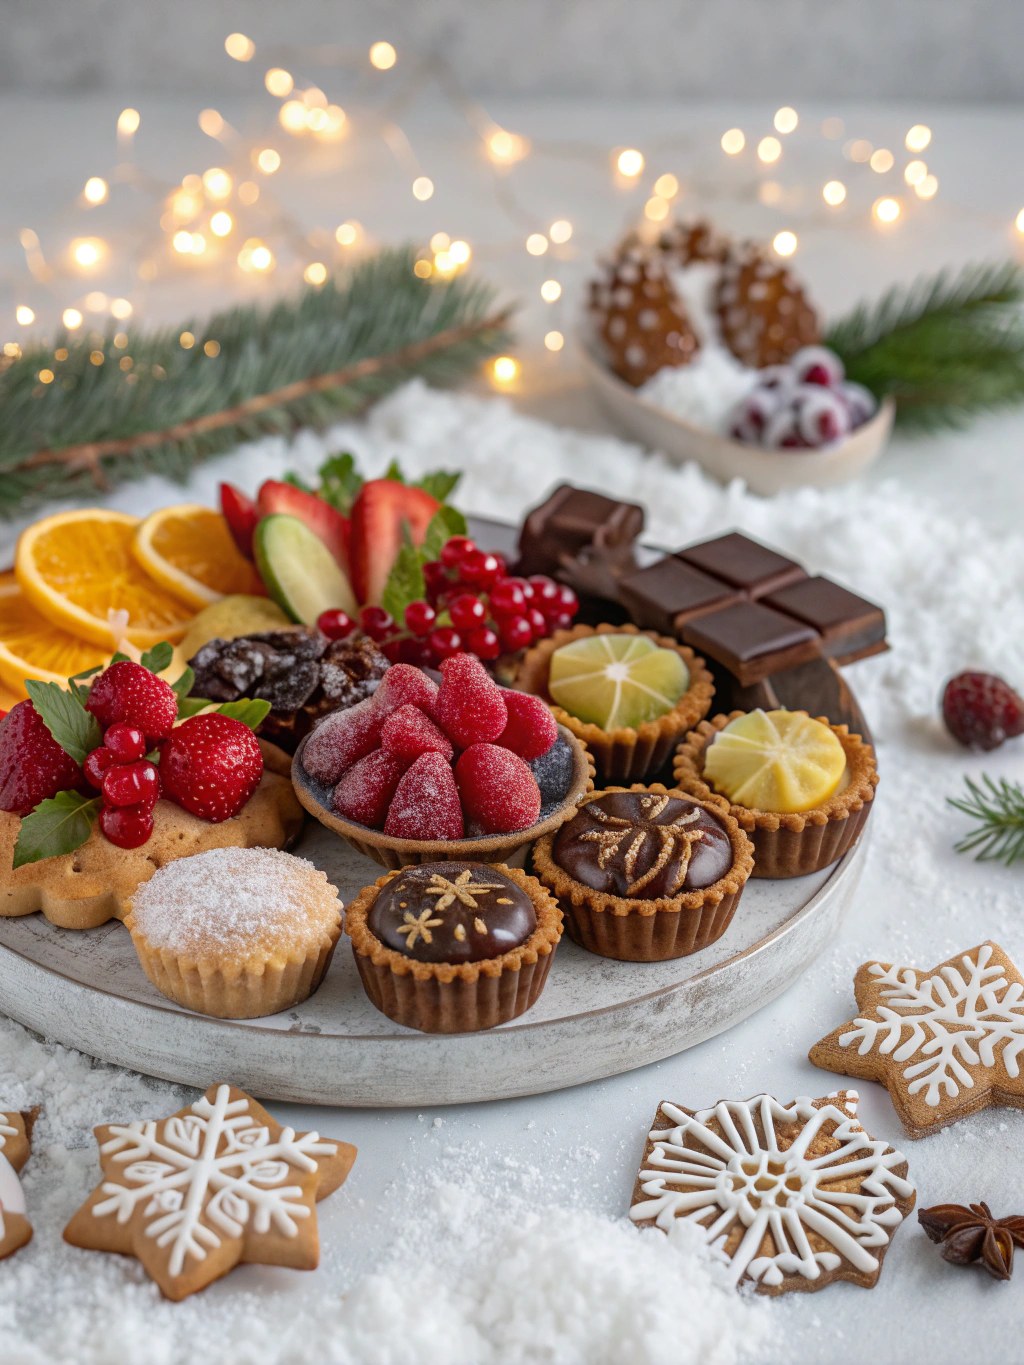
Ingredients & Components for Your Platter
The beauty of a dessert platter is its versatility. Think of it as a canvas where you are the artist. The key is to balance flavors, textures, and colors. Here’s a categorized list of components to inspire your ultimate holiday dessert board.
- Hero Baked Goods (Choose 2-3): These are the larger, eye-catching items that anchor your board.
- Mini Gingerbread or Sugar Cookies: Cut into festive shapes like stars, trees, and snowflakes.
- Fudgy Brownie Bites: A rich, chocolatey element that everyone loves.
- Miniature Cheesecakes or Tarts: Offer a creamy, decadent texture.
- Cranberry Orange Mini Scones: Provide a slightly savory and tangy contrast.
- No-Bake Wonders (Choose 2-3): These save you time and add delightful variety.
- Chocolate Truffles or Oreo Balls: Easy to make ahead and irresistibly rich.
- Peppermint Bark: A Christmas classic that adds a beautiful red and white pattern.
- Candied Nuts: Spiced pecans or candied walnuts add a satisfying crunch.
- Chocolate-Covered Pretzels: The perfect blend of salty and sweet.
- Festive Fruits & Dips (Essential for color and freshness):
- Fresh Berries: Raspberries and blackberries add deep, jewel-toned colors.
- Green Grapes & Pomegranate Arils: For a pop of festive green and red.
- Clementine Segments: Easy to peel and wonderfully sweet.
- Dips: A bowl of melted dark chocolate, salted caramel sauce, or a tangy raspberry coulis.
- Fillers & Decorative Touches (The final magic):
- Mini Marshmallows or Meringue Kisses: To fill small gaps and add a touch of white.
- Chocolate Coins or Wrapped Candies: Add a bit of shimmer and nostalgia.
- Fresh Rosemary or Mint Sprigs: For a touch of green and a wonderful holiday aroma.
- A dusting of powdered sugar to simulate snow.
Substitution Tip: Don’t have time to bake? High-quality store-bought cookies, brownies, and macarons are fantastic time-savers. Look for options in your local bakery for a gourmet touch.
Timing
One of the best things about these Christmas Dessert Platter Ideas is how they fit into a busy holiday schedule. Unlike a single, complex cake that can take hours, a platter is about assembly.
- Component Prep Time: 1-3 hours (if making some items from scratch). This can be spread over several days.
- Final Assembly Time: 20-30 minutes.
- Total Time: Approximately 30 minutes for assembly, plus any baking time.
Data from culinary surveys suggests that hosts who opt for grazing boards report a 40% reduction in day-of-event stress compared to those preparing multi-course plated desserts. This approach gives you back valuable time to spend with your guests, not your oven.
Step-by-Step Instructions for Assembly
Building a beautiful dessert platter is an art, but it’s one you can easily master. Follow these steps for a guaranteed show-stopper.
Step 1: Choose Your Theme & Color Palette
Before you place a single cookie, decide on your theme. Do you want a rustic “Winter Wonderland” with gingerbread and white chocolate? Or a vibrant “Holly Jolly” theme with bright reds and greens? Your theme will guide your dessert choices and create a cohesive, professional look. A focused color palette of 3-4 colors is visually more appealing than a random assortment.
Step 2: Select Your Platter & Place Your Bowls
The foundation matters! Use a large wooden board, a marble slab, or even a festive ceramic platter. The size depends on your guest count; a good rule of thumb is a 12×18 inch board for 8-10 people. Before adding any food, place your small bowls for dips or loose items like pomegranate seeds. Placing these first helps create structure and anchor points on the board.
Step 3: Anchor with Your Hero Desserts
Now, place your “hero” items—the largest desserts like brownie bites, scones, or mini tarts. Don’t group them all together. Instead, place them in different spots on the board, often in odd numbers (like in three different corners). This creates visual balance and draws the eye across the entire platter.
Step 4: Create “Rivers” of Smaller Treats
Next, arrange your smaller items like cookies, truffles, and chocolate-covered pretzels. A great technique is to create “rivers” or S-shaped curves that flow between the hero items. This technique guides the eye and makes the board look full and abundant. Alternate textures and shapes next to each other for more interest—place a round truffle next to a rectangular piece of peppermint bark, for example.
Step 5: Add Color and Freshness with Fruit
This is where your platter comes to life! Use fresh fruit to fill in the larger remaining gaps. A pile of vibrant red raspberries, a cluster of green grapes, or some bright clementine segments can transform your board from just brown and beige to a festive work of art. The freshness also provides a welcome contrast to the richer desserts.
Step 6: The Final Flourish with Fillers and Garnishes
You’re almost done! Use your smallest items—mini marshmallows, candied nuts, or chocolate chips—to fill in any tiny empty spaces. No part of the board should be visible. Finally, add your garnishes. Tuck in a few sprigs of fresh rosemary or mint for a pop of green and a lovely scent. A light dusting of powdered sugar over the whole board creates a magical, snowy effect.
Nutritional Information
The nutritional content of a Christmas dessert platter can vary widely based on your choices. However, a key benefit is portion control. Guests can sample small bites of several items rather than committing to a large slice of a single high-calorie dessert. A representative serving (e.g., one cookie, a brownie bite, a few berries, and a pretzel) might contain approximately 250-350 calories.
By incorporating a significant amount of fruit (aim for 30% of your board), you naturally lower the overall calorie density and increase the fiber and vitamin content. This makes it one of the more balanced Christmas Dessert Platter Ideas compared to traditional options.
Healthier Alternatives for the Recipe
Creating a healthier yet still decadent dessert board is easier than you think. These simple swaps can make a big difference without sacrificing flavor, making your holiday treats accessible to more guests.
- Go Dark with Chocolate: Opt for dark chocolate (70% cacao or higher) for your dips, barks, and truffles. It’s lower in sugar and packed with antioxidants.
- Sweeten with Fruit: Instead of refined sugar, use date paste or mashed bananas to sweeten homemade items like brownies or energy balls.
- Yogurt-Based Dips: Swap high-sugar caramel or fudge sauce for a dip made from Greek yogurt, a touch of maple syrup, and vanilla or cinnamon.
- Nut and Oat Cookies: Bake cookies using almond flour or rolled oats instead of all-purpose white flour to boost fiber and protein.
- Maximize the Fruit: Make fresh fruit the star of the show. Consider adding exotic options like star fruit slices or figs for visual appeal

Name: Yumi Hwag
Byline: Founder & Recipe Developer, Yumimeals
Bio : Yumi tests weeknight-friendly air fryer, slow cooker, and BBQ recipes in a small home kitchen. She focuses on simple steps, real-family testing, and clear food-safety guidance. Contact: [email protected]