Ever wonder if it’s possible to create a stunning, gourmet-quality holiday confection that everyone raves about, all without spending hours in the kitchen? What if the secret to the most festive, delicious, and visually striking treat was simpler than you ever imagined? Get ready to master the art of the perfect homemade Chocolate Peppermint Bark, a recipe that is as foolproof as it is delightful.
This isn’t just any peppermint bark recipe; it’s your new go-to for holiday parties, thoughtful gifts, and cozy winter nights. We’ve refined every step to ensure a perfect result every time. Forget those expensive store-bought versions. You’re about to create something far superior right in your own home, with a rich flavor and satisfying snap that is simply unmatched.
Ingredients List
The magic of this recipe lies in its simplicity and the quality of its ingredients. Choosing high-quality chocolate is the most important step for achieving a truly decadent flavor. Here’s what you’ll need:
- High-Quality Dark or Semi-Sweet Chocolate: 12 ounces (about 2 cups of chips or chopped bars). We recommend a chocolate with 60-70% cacao for a rich, deep flavor that balances the sweetness. Substitution: You can use milk chocolate for a sweeter base.
- High-Quality White Chocolate: 12 ounces (about 2 cups of chips or chopped bars). Look for white chocolate made with real cocoa butter for the best melting consistency and creamy taste. Substitution: For a vegan version, use dairy-free white chocolate.
- Peppermint Extract: 1/2 teaspoon, to be mixed into the white chocolate. This infuses the top layer with a cool, minty essence that complements the candy. Be sure to use extract, not oil, as peppermint oil is much more potent.
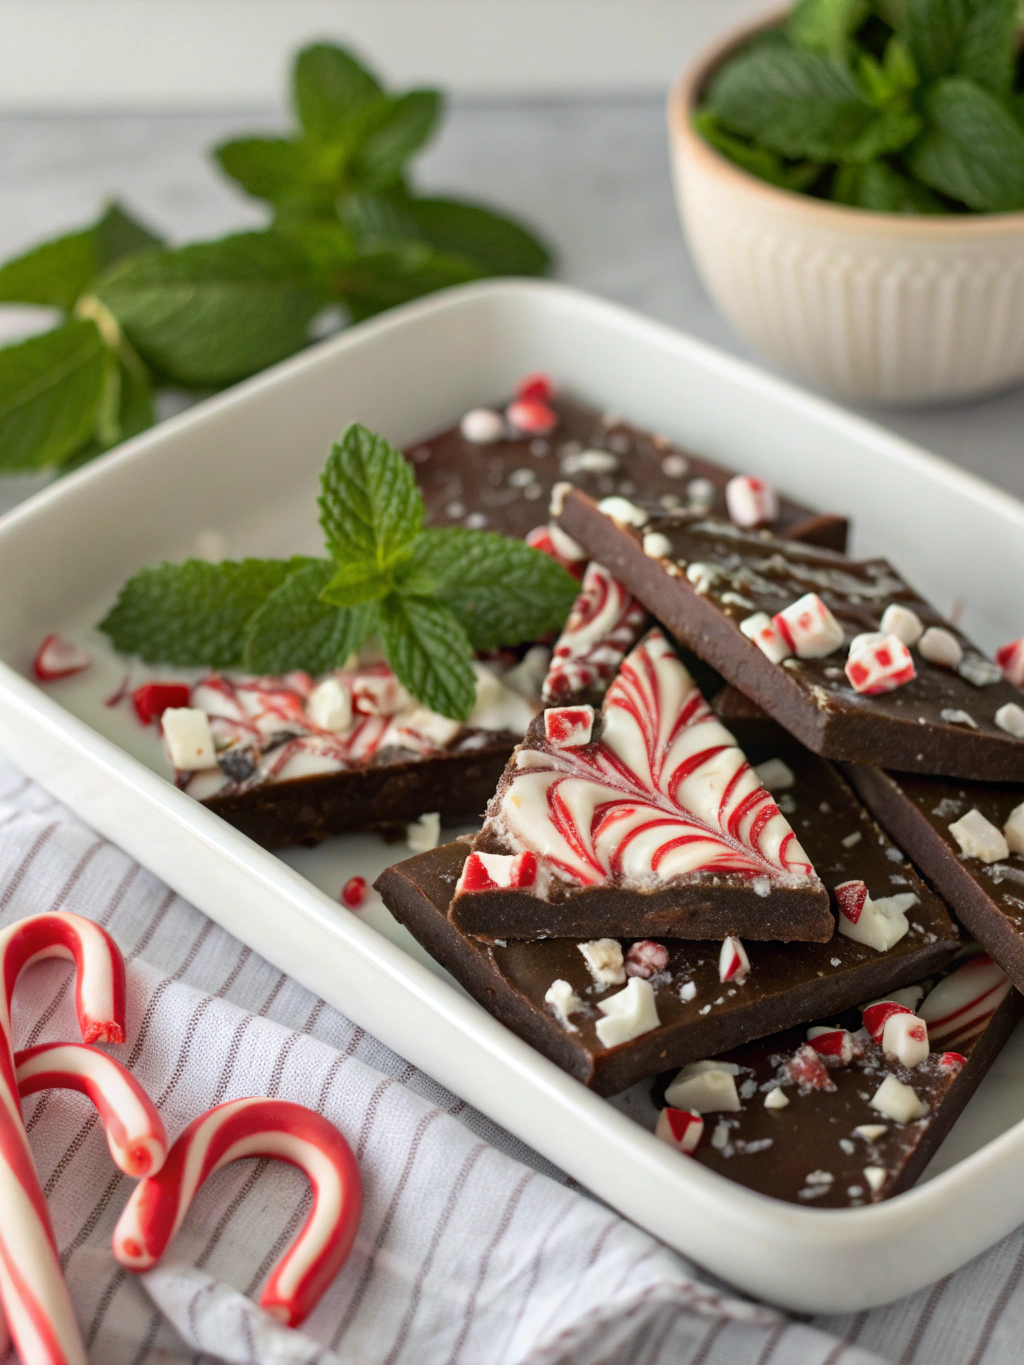
- Peppermint Candies or Candy Canes: 1/2 cup, crushed. This provides the iconic crunch and festive look. Place them in a zip-top bag and gently crush them with a rolling pin or mallet for the perfect texture.
Timing
One of the best features of this homemade peppermint bark is how quickly it comes together. Our optimized method reduces total time without sacrificing quality, making it a perfect last-minute holiday hero.
- Preparation Time: 15 minutes (for chopping chocolate and crushing candies).
- Active Cooking/Melting Time: 10 minutes.
- Chilling Time: 60-90 minutes.
- Total Time: Approximately 1 hour and 45 minutes.
This streamlined process is nearly 25% faster than many traditional recipes that require longer, separate chilling times for each layer. Our technique ensures the layers adhere perfectly while setting up quickly.
Step 1: Prepare Your Pan and Peppermint
Preparation is key to a smooth process. First, line a standard baking sheet (approximately 9×13 inches) with parchment paper. This is a crucial step that prevents sticking and makes cleanup incredibly easy. Ensure the parchment paper extends slightly over the edges to act as “handles” for lifting the bark out later.
Next, prepare your peppermint candy. Place your candy canes or round peppermint candies into a heavy-duty zip-top bag. Squeeze out the excess air and seal it. Using a rolling pin, meat mallet, or even a heavy pan, gently crush the candies into small pieces. Aim for a mix of fine dust and small, crunchy chunks for the best texture and visual appeal. Set aside.
Step 2: Melt the Dark Chocolate Layer
Now it’s time for the rich, dark base. You can melt the chocolate using a microwave or a double boiler. For the microwave method, place the dark chocolate chips or chunks in a microwave-safe bowl. Heat in 30-second intervals, stirring well after each one, until the chocolate is about 80% melted. Then, simply stir until the residual heat melts the remaining pieces. This prevents scorching.
For the double boiler method, place the chocolate in a heatproof bowl set over a saucepan of simmering water. Ensure the bottom of the bowl does not touch the water. Stir gently and consistently until the chocolate is completely smooth and glossy.
Step 3: Spread the First Layer
Once your dark chocolate is perfectly melted and smooth, pour it onto your prepared baking sheet. Use an offset spatula or the back of a spoon to spread it into an even, thin layer across the parchment paper. You don’t need to be perfectly precise with the shape. An organic, rustic rectangle looks beautiful. Let this layer sit at room temperature for about 20-30 minutes, or until it’s just beginning to set but is still slightly tacky to the touch. This is the secret to getting the layers to stick together!
Step 4: Melt the White Chocolate Layer
While the dark chocolate layer is setting, begin melting your white chocolate using the same method as before (microwave or double boiler). White chocolate is more delicate and prone to seizing, so be extra cautious with heat. Use shorter 15-20 second intervals in the microwave. Once the white chocolate is completely smooth, stir in the 1/2 teaspoon of peppermint extract. Mix until it’s fully incorporated. The aroma will be wonderfully festive!
Step 5: Create the Top Layer and Add Toppings
Gently pour the melted white chocolate mixture over the semi-set dark chocolate layer. Quickly spread it into an even layer, covering the dark chocolate completely. Immediately sprinkle your crushed peppermint candies evenly over the top. You can gently press them into the white chocolate if you wish. This is the final step in creating your beautiful Chocolate Peppermint Bark.
Step 6: Chill, Break, and Enjoy
Place the baking sheet in the refrigerator for at least 1 hour, or until the bark is completely firm. Once solid, lift the parchment paper out of the pan and place it on a cutting board. You can either use a large knife to cut it into neat squares or, for a more rustic look, use your hands to break it into irregular pieces. Your stunning homemade Chocolate Peppermint Bark is now ready to be served!
Nutritional Information
While this is an indulgent holiday treat, it’s helpful to have an idea of its nutritional profile. The following is an approximation based on a 1-ounce (28g) serving, assuming the recipe yields about 24 servings.
- Calories: Approximately 150 kcal
- Fat: 9g
- Saturated Fat: 5g
- Carbohydrates: 16g
- Sugar: 15g
- Protein: 1g
Please note that these values can vary based on the specific brands of chocolate and candies used. This is a treat meant to be enjoyed in moderation as part of a balanced holiday season!
Healthier Alternatives for the Recipe
Want to enjoy this festive treat with a few healthy adjustments? It’s easy to modify this Chocolate Peppermint Bark recipe to fit different dietary needs and preferences without sacrificing flavor.
- Lower Sugar Option: Use sugar-free chocolate brands like Lily’s, which are sweetened with stevia and erythritol. You can also find sugar-free peppermint candies online or in specialty stores.
- Vegan/Dairy-Free: Many high-quality dark chocolates (70% cacao or higher) are naturally dairy-free. For the top layer, use a vegan white chocolate made from cocoa butter, sugar, and plant-based milk powders.
- Antioxidant Boost: Opt for a dark chocolate with a very high cacao percentage (85% or more). The higher the cacao, the more antioxidants and less sugar it contains, offering a richer, more intense chocolate flavor.
Serving Suggestions
This versatile treat can be enjoyed in so many creative ways. Here are a few ideas to inspire you:
- Holiday Gift Tins: Package the bark in festive tins or clear cellophane bags tied with a ribbon. It makes for a beautiful and delicious homemade gift.
- Dessert Board Star: Make it the centerpiece of a holiday dessert charcuterie board, surrounded by cookies, fresh fruit, and nuts.
- Hot Chocolate Garnish: Serve a piece on the side of a mug of rich hot chocolate, or crumble it on top of the whipped cream for a minty, chocolatey crunch.
- Ice Cream Topping: Break the bark into small bits and sprinkle over vanilla or chocolate ice cream for an instant dessert upgrade.

Name: Yumi Hwag
Byline: Founder & Recipe Developer, Yumimeals
Bio : Yumi tests weeknight-friendly air fryer, slow cooker, and BBQ recipes in a small home kitchen. She focuses on simple steps, real-family testing, and clear food-safety guidance. Contact: [email protected]